REG add HKCU\Software\Microsoft\Windows\CurrentVersion\Policies\System /v DisableRegistryTools /t REG_DWORD /d 0
Then a prompt will come up with this question: Value DisableRegistryTools exists, overwrite (Y/N)? Type yes and hit Enter.
After u did that also type this command in the run box and hit enter.
REG add HKLM\Software\Microsoft\Windows\CurrentVersion\Policies\System /v DisableRegistryTools /t REG_DWORD /d 0
Friday, May 28, 2010
nagios quick start
Introduction
This guide is intended to provide you with simple instructions on how to install Nagios from source (code) on Fedora and have it monitoring your local machine inside of 20 minutes. No advanced installation options are discussed here - just the basics that will work for 95% of users who want to get started.
These instructions were written based on a standard Fedora Core 6 Linux distribution.
What You'll End Up With
If you follow these instructions, here's what you'll end up with:
* Nagios and the plugins will be installed underneath /usr/local/nagios
* Nagios will be configured to monitor a few aspects of your local system (CPU load, disk usage, etc.)
* The Nagios web interface will be accessible at http://localhost/nagios/
Prerequisites
During portions of the installation you'll need to have root access to your machine.
Make sure you've installed the following packages on your Fedora installation before continuing.
* Apache
* PHP
* GCC compiler
* GD development libraries
You can use yum to install these packages by running the following commands (as root):
yum install httpd php
yum install gcc glibc glibc-common
yum install gd gd-devel
1) Create Account Information
Become the root user.
su -l
Create a new nagios user account and give it a password.
/usr/sbin/useradd -m nagios
passwd nagios
Create a new nagcmd group for allowing external commands to be submitted through the web interface. Add both the nagios user and the apache user to the group.
/usr/sbin/groupadd nagcmd
/usr/sbin/usermod -a -G nagcmd nagios
/usr/sbin/usermod -a -G nagcmd apache
2) Download Nagios and the Plugins
Create a directory for storing the downloads.
mkdir ~/downloads
cd ~/downloads
Download the source code tarballs of both Nagios and the Nagios plugins (visit http://www.nagios.org/download/ for links to the latest versions). These directions were tested with Nagios 3.1.1 and Nagios Plugins 1.4.11.
wget http://osdn.dl.sourceforge.net/sourceforge/nagios/nagios-3.2.0.tar.gz
wget http://osdn.dl.sourceforge.net/sourceforge/nagiosplug/nagios-plugins-1.4.11.tar.gz
3) Compile and Install Nagios
Extract the Nagios source code tarball.
cd ~/downloads
tar xzf nagios-3.2.0.tar.gz
cd nagios-3.2.0
Run the Nagios configure script, passing the name of the group you created earlier like so:
./configure --with-command-group=nagcmd
Compile the Nagios source code.
make all
Install binaries, init script, sample config files and set permissions on the external command directory.
make install
make install-init
make install-config
make install-commandmode
Don't start Nagios yet - there's still more that needs to be done...
4) Customize Configuration
Sample configuration files have now been installed in the /usr/local/nagios/etc directory. These sample files should work fine for getting started with Nagios. You'll need to make just one change before you proceed...
Edit the /usr/local/nagios/etc/objects/contacts.cfg config file with your favorite editor and change the email address associated with the nagiosadmin contact definition to the address you'd like to use for receiving alerts.
vi /usr/local/nagios/etc/objects/contacts.cfg
5) Configure the Web Interface
Install the Nagios web config file in the Apache conf.d directory.
make install-webconf
Create a nagiosadmin account for logging into the Nagios web interface. Remember the password you assign to this account - you'll need it later.
htpasswd -c /usr/local/nagios/etc/htpasswd.users nagiosadmin
Restart Apache to make the new settings take effect.
service httpd restart
Note Note: Consider implementing the ehanced CGI security measures described here to ensure that your web authentication credentials are not compromised.
6) Compile and Install the Nagios Plugins
Extract the Nagios plugins source code tarball.
cd ~/downloads
tar xzf nagios-plugins-1.4.11.tar.gz
cd nagios-plugins-1.4.11
Compile and install the plugins.
./configure --with-nagios-user=nagios --with-nagios-group=nagios
make
make install
7) Start Nagios
Add Nagios to the list of system services and have it automatically start when the system boots.
chkconfig --add nagios
chkconfig nagios on
Verify the sample Nagios configuration files.
/usr/local/nagios/bin/nagios -v /usr/local/nagios/etc/nagios.cfg
If there are no errors, start Nagios.
service nagios start
8) Modify SELinux Settings
Fedora ships with SELinux (Security Enhanced Linux) installed and in Enforcing mode by default. This can result in "Internal Server Error" messages when you attempt to access the Nagios CGIs.
See if SELinux is in Enforcing mode.
getenforce
Put SELinux into Permissive mode.
setenforce 0
To make this change permanent, you'll have to modify the settings in /etc/selinux/config and reboot.
Instead of disabling SELinux or setting it to permissive mode, you can use the following command to run the CGIs under SELinux enforcing/targeted mode:
chcon -R -t httpd_sys_content_t /usr/local/nagios/sbin/
chcon -R -t httpd_sys_content_t /usr/local/nagios/share/
For information on running the Nagios CGIs under Enforcing mode with a targeted policy, visit the Nagios Support Portal or Nagios Community Wiki.
9) Login to the Web Interface
You should now be able to access the Nagios web interface at the URL below. You'll be prompted for the username (nagiosadmin) and password you specified earlier.
http://localhost/nagios/
Click on the "Service Detail" navbar link to see details of what's being monitored on your local machine. It will take a few minutes for Nagios to check all the services associated with your machine, as the checks are spread out over time.
10) Other Modifications
Make sure your machine's firewall rules are configured to allow access to the web server if you want to access the Nagios interface remotely.
Configuring email notifications is out of the scope of this documentation. While Nagios is currently configured to send you email notifications, your system may not yet have a mail program properly installed or configured. Refer to your system documentation, search the web, or look to the Nagios Support Portal or Nagios Community Wiki for specific instructions on configuring your system to send email messages to external addresses. More information on notifications can be found here.
11) You're Done
Congratulations! You sucessfully installed Nagios. Your journey into monitoring is just beginning. You'll no doubt want to monitor more than just your local machine, so check out the following docs...
* Monitoring Windows machines
* Monitoring Linux/Unix machines
* Monitoring Netware servers
* Monitoring routers/switches
* Monitoring publicly available services (HTTP, FTP, SSH, etc.)
To Enable or Disable pendrive
HKEY_LOCAL_MACHINE\SYSTEM\CurrentControlSet\Services\USBSTOR proceed further.
To disable access
REGEDIT4
[HKEY_LOCAL_MACHINE\SYSTEM\CurrentControlSet\Services\USBSTOR]
“Start”=dword:00000004
To enable access
REGEDIT4
[HKEY_LOCAL_MACHINE\SYSTEM\CurrentControlSet\Services\USBSTOR]
“Start”=dword:00000003
To disable access
REGEDIT4
[HKEY_LOCAL_MACHINE\SYSTEM\CurrentControlSet\Services\USBSTOR]
“Start”=dword:00000004
To enable access
REGEDIT4
[HKEY_LOCAL_MACHINE\SYSTEM\CurrentControlSet\Services\USBSTOR]
“Start”=dword:00000003
X-Server troubleshootings:
Run Command:
yum groupinstall "X Window System" "KDE (K Desktop Environment)"
OR
yum install "GNOME Desktop Environment"
yum groupinstall "X Window System" "KDE (K Desktop Environment)"
OR
yum install "GNOME Desktop Environment"
Nagios + SMS notifications with Gammu and Siemens MC35i
What you need :
- a working Nagios
- a GSM modem (this has been tested with a Siemens MC35i) or a cellphone with modem capabilities supported by Linux (I don’t have that)
- Gammu
Set up the modem :
Connect the GSM modem to the Nagios machine through the serial port and make sure it receives signal from the carrier (LED blinking slowly means everything is OK, if not it blinks fast)
Install and configure Gammu :
# apt-get install gammu
The modem should be accessible through /dev/ttyS0
# vim /etc/gammurc
[gammu]
port = /dev/ttyS0
connection = at19200
startinfo = no
name = Siemens
synchronizetime = no
use_locking = no
Test the modem
# gammu --identify
Manufacturer : Siemens
Model : unknown (MC35i)
Firmware : REVISION 02.00
IMEI : 3515590XXXXXX
Product code : MC35i
SIM IMSI : 2061021XXXXXX
# gammu --networkinfo
Network state : home network
Network : 206 10 (Mobistar, Belgium), LAC 6B08, CID 19EC
Name in phone : "B mobistar"
# gammu --monitor 1
Press Ctrl+C to break...
Entering monitor mode...
Enabling info about incoming SMS : No error.
Enabling info about incoming CB : No error.
Enabling info about calls : No error.
Enabling info about USSD : No error.
SIM phonebook : 59 used, 41 free
Dialled numbers : 7 used, 3 free
Received numbers : 0 used, 10 free
Missed numbers : 0 used, 10 free
Own numbers : 1 used, 2 free
Phone phonebook : 0 used, 250 free
Leaving monitor mode...
Everything looks fine !
Before we continue, let’s check permissions on /dev/ttyS0
# ls -l /dev/ttyS0
crw-rw---- 1 root dialout 4, 64 jan 5 16:14 /dev/ttyS0
Nagios is usually running as user “nagios”, so any notification command would be executed as “nagios”. We can see user nagios wouldn’t have permissions to access devices connected to /dev/ttyS0.
We’ll apply the SUID bit (set-UID) on the command in charge of sending SMS notifications, this will execute gammu on behalf of user root.
# chmod 4755 /usr/bin/gammu
We could put nagios in the dialout group as well. I didn’t as Nagios is running on an isolated box in the LAN.
If someone is able to mess up with gammu executed as SUID on that box, that would mean I’m already in a lot of troubles anyway :-)
Before we continue, we’ll try to send a SMS to the belgian cell number 0475123456
# echo "test" | gammu --sendsms TEXT 0475123456
If you want break, press Ctrl+C...
Sending SMS 1/1....waiting for network answer..OK, message reference=181
It worked.
Now, an example of Nagios config for SMS notifications :
define command{
command_name host-notify-by-sms
command_line /usr/bin/printf "%b" "NAGIOS / Host: "$HOSTNAME$" / State: $HOSTSTATE$ / Info:$HOSTOUTPUT$ / Date:$SHORTDATETIME$" | /usr/bin/gammu --sendsms TEXT $CONTACTPAGER$
}
define command{
command_name notify-by-sms
command_line /usr/bin/printf "%b" "NAGIOS / Host: "$HOSTALIAS$" / State: $SERVICESTATE$ / Info:$SERVICEOUTPUT$ / Date:$SHORTDATETIME$" | /usr/bin/gammu --sendsms TEXT $CONTACTPAGER$
}
define contact{
contact_name email
alias email
service_notification_period 24x7
host_notification_period 24x7
service_notification_options c,r
host_notification_options d,r
service_notification_commands notify-by-email
host_notification_commands host-notify-by-email
email nagios@example.org
}
define contact{
contact_name sms
alias sms
service_notification_period smshours
host_notification_period smshours
service_notification_options c,r
host_notification_options d,r
service_notification_commands notify-by-sms
host_notification_commands host-notify-by-sms
pager 0475123456
}
define contactgroup{
contactgroup_name admins
alias Nagios Administrators
members email, sms
}
define timeperiod{
timeperiod_name smshours
alias SMS Hours
sunday 00:00-24:00
monday 00:00-07:00,18:00-24:00
tuesday 00:00-07:00,18:00-24:00
wednesday 00:00-07:00,18:00-24:00
thursday 00:00-07:00,18:00-24:00
friday 00:00-07:00,18:00-24:00
saturday 00:00-24:00
}
Installation and configuration of Astrisk + voice glue
CentOS 5.2 and Asterisk 1.6.x installation
Reference: http://www.voip-info.org/wiki/view/CentOS+5+and+Asterisk+1.4.x+installation
Base Install of Asterisk on an i386 CentOS/RHEL box:
More as an aide memoir for us than anything else, but if somebody does find it useful, then that's good too!
For reasons detailed elsewhere, you're best not using a GUI, so do the installation from the command line ('linux-text' at the GRUB prompt). When you select the packages, the only one you need is 'server'. Disk partitioning, networking etc. is all entirely up to you!
At your first login, you'll be presented with a simple administration screen. Disable SELinux and (for now) the firewall.
Dependencies
The first thing to do is to get your box up to date. Try:
yum -y upgrade
and then reboot. Otherwise, to update all the installed packages, at the shell, run
yum -y update
When you've done either of the above, reboot the machine when it's finished (as it'll install a new kernel) and then run
yum -y update
again and repeat until there are no more updates.
Quick method:
Do you trust me? If so, the line below will install all the dependencies you need (and then some!) - cut and paste from here if you're happy to install things you may or may not need.
yum -y install gcc gcc-c++ kernel-devel bison \
openssl openssl-devel perl perl-Net-SSLeay perl-Crypt-SSLeay \
libtermcap-devel ncurses-devel doxygen curl-devel newt-devel \
mlocate lynx tar wget nmap bzip2 mod_ssl crontabs vixie-cron \
speex speex-devel unixODBC unixODBC-devel libtool-ltdl \
libtool-ltdl-devel mysql-connector-odbc mysql mysql-devel \
mysql-server php-mysql php-mbstring php-mcrypt flex screen
Individual application specific dependencies
Asterisk
We've got to be able to compile it!
yum -y install gcc gcc-c++
Note that you may need to use the following if you are running a Xen enabled kernel:
yum -y install kernel-xen-devel
If you want the 'zttool' application, you'll need to:
yum -y install newt-devel
Other things you may find useful (if they're not already installed):
yum -y install mlocate lynx tar wget nmap bzip2 mod_ssl crontabs vixie-cron
Speex (optional)
Speex support depends on 'speex_preprocess_ctl' which is not available in the standard Speex packages. It may be possible to compile an older version of Speex if required.ODBC stuff (optional)
Note that if you have already installed Asterisk, you will need to run 'configure', 'make' and 'make install' to detect ODBC and compile it in.
yum -y install unixODBC unixODBC-devel libtool-ltdl libtool-ltdl-devel
MySQL ODBC interface/connector (optional, but required if using ODBC and MySQL)
yum -y install mysql-connector-odbc
And then edit the file '/etc/odbcinst.ini' (or '/usr/local/odbcinst.ini') and replace 'Driver = /usr/lib/libmyodbc.so' with 'Driver = /usr/lib/libmyodbc3.so'
MySQL (optional)
yum -y install mysql mysql-devel mysql-server
chkconfig mysqld on
service mysqld start
chkconfig mysqld on
service mysqld start
PHPMyAdmin (optional)
Download the latest version from http://www.phpmyadmin.net/, unzip/unbzip/untar into /var/www/htdocs/phpmyadmin (for the time being). Make sure Apache starts on boot.
yum -y install php-mysql php-mbstring php-mcrypt
chkconfig httpd on
service httpd start
chkconfig httpd on
service httpd start
Surf to https://i.p.address/phpmyadmin and check it works.
Webmin (optional)
If SSL is required, ensure that the correct bits are installed
yum -y install openssl openssl-devel perl perl-Net-SSLeay perl-Crypt-SSLeay
Download the latest version of the RPM from http://www.webmin.com/
rpm -i webmin-VERSION
chkconfig webmin on
service webmin start
chkconfig webmin on
service webmin start
Surf to https://i.p.address:10000 and check it works.
Download and install Asterisk and components
Download
Download the latest asterisk version /usr/src/asterisk and untar the files as follows:
mkdir -p /usr/src/asterisk
cd /usr/src/asterisk
wget http://downloads.asterisk.org/pub/telephony/asterisk/asterisk-1.6.1-current.tar.gz
wget http://downloads.asterisk.org/pub/telephony/asterisk/asterisk-addons-1.6.1-current.tar.gz
wget http://downloads.asterisk.org/pub/telephony/dahdi-linux-complete/dahdi-linux-complete-current.tar.gz
wget http://downloads.digium.com/pub/libpri/libpri-1.4-current.tar.gz
tar -zxf dahdi-linux-complete-current.tar.gz
tar -zxf asterisk-1.6.1-current.tar.gz
tar -zxf libpri-1.4-current.tar.gz
tar -zxf asterisk-addons-1.6.1-current.tar.gz
You'll end up with four tar files and four directories in the directory '/usr/src/asterisk'.
Libpri (optional)
If you are using E1 cards you need to install LIBPRI. If you do want to use LIBPRI, make sure you compile and install it before you compile Asterisk. Replace 'VERSION' with the correct details.
cd /usr/src/asterisk/libpri-VERSION
make clean
make
make install
make clean
make
make install
DAHDI
You're pretty much going to need DAHDI. If not for any hardware then for the dummy timer anyway. Note that the stock CentOS kernels come with a 1000HZ timer and so don't need recompiling (phew!). Replace 'VERSION' with the correct details.
cd /usr/src/asterisk/dahdi-linux-complete-VERSION
make all
make install
make config
make all
make install
make config
Edit /etc/dahdi/modules, /etc/dahdi/system.conf and /etc/asterisk/chan_dahdi.conf for your site.
Set DAHDI to start automatically and then start it.
chkconfig dahdi on
service dahdi start
service dahdi start
Asterisk
cd /usr/src/asterisk/asterisk-VERSION
make clean
./configure
make clean
./configure
Choose which options to install (audio files, voicemail storage, codecs etc.)
make menuselect
make
make install
make
make install
Install sample files in /etc/asterisk, install docs/manpages and set to start on boot.
make samples
make progdocs
make config
chkconfig asterisk on
make progdocs
make config
chkconfig asterisk on
Check Asterisk starts properly:
asterisk -vvvvvvvvvvvvvvvvvvvc
stop now
stop now
If not, you've probably not been following these instructions carefully! Assuming it does start properly, you probably want to start it in the background:
service asterisk start
Asterisk-addons
cd /usr/src/asterisk/asterisk-addons-VERSION
make clean
./configure
make menuselect
./configure
make menuselect
Choose what you do and don't want. Unless you really need oh323, deselect it as it can be the cause of compilation woes.
make
make install
make install
Install sample files in /etc/asterisk
make samples
Edit /etc/asterisk/cdr_mysql.conf and add 'loguniqueid=yes' to the global section.
mISDN drivers for Digium B410P (optional)
Removed - have yet to test installation with DAHDI
Configure MySQL (optional)
The information below shows table definitions for all of the tables Asterisk can use with MySQL or ODBC.Notes
The UniqueID field in the CDR table is not necessarily unique! Due to the very very dodgy way Asterisk handles unique IDs, if you set the field to be the primary key (as advised elsewhere), you will lose data.SQL
Note that the SIP 'qualify' field has a default value set to 'yes'. This is for two reasons. Firstly, I wrote these notes because it's how I use and want to use Asterisk. Secondly, whether qualification is enabled or not in realtime is controlled by the 'rtcachefriends' setting in sip.conf - if it's 'no', then whether 'qualify' is 'yes' or 'no' in the database is irrelevant. It makes sense therefore to enable it in the database and then turn it on or off with the 'rtcachefriends' setting.SET SQL_MODE="NO_AUTO_VALUE_ON_ZERO";
##
##Database: `asterisk`
##
CREATE DATABASE `asterisk` DEFAULT CHARACTER SET latin1 COLLATE latin1_swedish_ci;
USE `asterisk`;
##########################################################
##
##Table structure for table `cdr`
##
CREATE TABLE IF NOT EXISTS `cdr` (
`recid` mediumint(8) unsigned NOT NULL auto_increment COMMENT 'Record ID',
`calldate` datetime NOT NULL default '0000-00-00 00:00:00',
`clid` varchar(80) NOT NULL default '',
`src` varchar(80) NOT NULL default '',
`dst` varchar(80) NOT NULL default '',
`dcontext` varchar(80) NOT NULL default '',
`channel` varchar(80) NOT NULL default '',
`dstchannel` varchar(80) NOT NULL default '',
`lastapp` varchar(80) NOT NULL default '',
`lastdata` varchar(80) NOT NULL default '',
`duration` int(11) NOT NULL default '0',
`billsec` int(11) NOT NULL default '0',
`disposition` varchar(45) NOT NULL default '',
`amaflags` int(11) NOT NULL default '0',
`accountcode` varchar(20) NOT NULL default '',
`uniqueid` varchar(32) NOT NULL default '',
`userfield` varchar(255) NOT NULL default '',
PRIMARY KEY (`recid`),
KEY `calldate` (`calldate`),
KEY `dst` (`dst`),
KEY `accountcode` (`accountcode`),
KEY `src` (`src`),
KEY `disposition` (`disposition`),
KEY `uniqueid` (`uniqueid`)
) ENGINE=InnoDB DEFAULT CHARSET=latin1 AUTO_INCREMENT=1 ;
##########################################################
##
##Table structure for table `queue_members`
##
CREATE TABLE IF NOT EXISTS `queue_members` (
`queue_name` varchar(128) NOT NULL default '',
`interface` varchar(128) NOT NULL default '',
`penalty` int(11) default NULL,
PRIMARY KEY (`queue_name`,`interface`)
) ENGINE=MyISAM DEFAULT CHARSET=latin1;
##########################################################
##
##Table structure for table `queues`
##
CREATE TABLE IF NOT EXISTS `queues` (
`name` varchar(128) NOT NULL,
`musiconhold` varchar(128) default 'default',
`announce` varchar(128) default NULL,
`context` varchar(128) default NULL,
`timeout` int(11) default '60',
`monitor_join` tinyint(1) default NULL,
`monitor_format` varchar(128) default NULL,
`queue_youarenext` varchar(128) default NULL,
`queue_thereare` varchar(128) default NULL,
`queue_callswaiting` varchar(128) default NULL,
`queue_holdtime` varchar(128) default NULL,
`queue_minutes` varchar(128) default NULL,
`queue_seconds` varchar(128) default NULL,
`queue_lessthan` varchar(128) default NULL,
`queue_thankyou` varchar(128) default NULL,
`queue_reporthold` varchar(128) default NULL,
`announce_frequency` int(11) default NULL,
`announce_round_seconds` int(11) default NULL,
`announce_holdtime` varchar(128) default NULL,
`periodic_announce` varchar(128) default NULL,
`periodic_announce_frequency` int(11) default NULL,
`retry` int(11) default '5',
`ringinuse` varchar(5) NOT NULL default 'no',
`autofill` varchar(5) NOT NULL default 'yes',
`autopause` varchar(5) NOT NULL default 'no',
`setinterfacevar` varchar(5) NOT NULL default 'yes',
`wrapuptime` int(11) default '30',
`maxlen` int(11) default NULL,
`servicelevel` int(11) default NULL,
`strategy` varchar(128) default 'ringall',
`joinempty` varchar(128) default 'no',
`leavewhenempty` varchar(128) default 'yes',
`eventmemberstatus` tinyint(1) default NULL,
`eventwhencalled` tinyint(1) default NULL,
`reportholdtime` tinyint(1) default NULL,
`memberdelay` int(11) default NULL,
`weight` int(11) default NULL,
`timeoutrestart` tinyint(1) default NULL,
PRIMARY KEY (`name`)
) ENGINE=MyISAM DEFAULT CHARSET=latin1;
##########################################################
##
##Table structure for table `sip`
##
CREATE TABLE IF NOT EXISTS `sip` (
`id` int(11) NOT NULL auto_increment,
`name` varchar(80) NOT NULL,
`host` varchar(31) NOT NULL default 'dynamic',
`nat` varchar(5) NOT NULL default 'no',
`type` enum('user','peer','friend') NOT NULL default 'friend',
`accountcode` varchar(20) default 'ACCOUNT',
`amaflags` varchar(13) default NULL,
`callgroup` varchar(10) default NULL,
`callerid` varchar(80) default NULL,
`call-limit` varchar(6) NOT NULL default '10',
`cancallforward` char(3) default 'yes',
`canreinvite` char(3) default 'no',
`context` varchar(80) default 'from-sip',
`defaultip` varchar(15) default NULL,
`dtmfmode` varchar(7) default 'rfc2833',
`fromuser` varchar(80) default NULL,
`fromdomain` varchar(80) default NULL,
`insecure` varchar(4) default NULL,
`language` char(2) default 'en',
`mailbox` varchar(50) default NULL,
`md5secret` varchar(80) default NULL,
`deny` varchar(95) default '0.0.0.0/0.0.0.0',
`permit` varchar(95) default '0.0.0.0/0.0.0.0',
`mask` varchar(95) default NULL,
`musiconhold` varchar(100) default 'default',
`pickupgroup` varchar(10) default NULL,
`qualify` char(3) default 'yes',
`regexten` varchar(80) default NULL,
`restrictcid` char(3) default NULL,
`rtptimeout` char(3) default NULL,
`rtpholdtimeout` char(3) default NULL,
`secret` varchar(80) default 'SECRET',
`setvar` varchar(100) default NULL,
`disallow` varchar(100) default 'all',
`allow` varchar(100) default 'alaw',
`fullcontact` varchar(80) NOT NULL default '',
`ipaddr` varchar(15) NOT NULL default '',
`port` smallint(5) unsigned NOT NULL default '0',
`regserver` varchar(100) default NULL,
`regseconds` int(11) NOT NULL default '0',
`username` varchar(80) NOT NULL,
`defaultuser` varchar(80) NOT NULL,
PRIMARY KEY (`id`),
UNIQUE KEY `name` (`name`),
KEY `name_2` (`name`)
) ENGINE=MyISAM DEFAULT CHARSET=latin1 ROW_FORMAT=DYNAMIC AUTO_INCREMENT=301 ;
##########################################################
##
##Table structure for table `voicemail_messages`
##
CREATE TABLE IF NOT EXISTS `voicemail_messages` (
`id` int(11) NOT NULL auto_increment,
`msgnum` int(11) NOT NULL default '0',
`dir` varchar(80) default '',
`context` varchar(80) default '',
`macrocontext` varchar(80) default '',
`callerid` varchar(40) default '',
`origtime` varchar(40) default '',
`duration` varchar(20) default '',
`mailboxuser` varchar(80) default '',
`mailboxcontext` varchar(80) default '',
`recording` longblob,
PRIMARY KEY (`id`),
KEY `dir` (`dir`)
) ENGINE=MyISAM DEFAULT CHARSET=latin1 AUTO_INCREMENT=1088 ;
##########################################################
##
##Table structure for table `voicemail_users`
##
CREATE TABLE IF NOT EXISTS `voicemail_users` (
`uniqueid` int(11) NOT NULL auto_increment,
`customer_id` varchar(11) NOT NULL default '0',
`context` varchar(50) NOT NULL default 'default',
`mailbox` varchar(11) NOT NULL default '0',
`password` varchar(5) NOT NULL default '6666',
`fullname` varchar(150) NOT NULL,
`email` varchar(50) NOT NULL,
`pager` varchar(50) NOT NULL,
`tz` varchar(10) NOT NULL default 'en',
`attach` varchar(4) NOT NULL default 'yes',
`saycid` varchar(4) NOT NULL default 'yes',
`dialout` varchar(10) NOT NULL,
`callback` varchar(10) NOT NULL,
`review` varchar(4) NOT NULL default 'no',
`operator` varchar(4) NOT NULL default 'no',
`envelope` varchar(4) NOT NULL default 'no',
`sayduration` varchar(4) NOT NULL default 'no',
`saydurationm` tinyint(4) NOT NULL default '1',
`sendvoicemail` varchar(4) NOT NULL default 'no',
`delete` varchar(4) NOT NULL default 'no',
`nextaftercmd` varchar(4) NOT NULL default 'yes',
`forcename` varchar(4) NOT NULL default 'no',
`forcegreetings` varchar(4) NOT NULL default 'no',
`hidefromdir` varchar(4) NOT NULL default 'yes',
`stamp` timestamp NOT NULL default CURRENT_TIMESTAMP on update CURRENT_TIMESTAMP,
PRIMARY KEY (`uniqueid`),
KEY `mailbox_context` (`mailbox`,`context`)
) ENGINE=MyISAM DEFAULT CHARSET=latin1 AUTO_INCREMENT=101 ;
## ########################################################
##
##Create realtime user with approximately the right privs.
##
CREATE USER 'astrealtime'@'localhost' IDENTIFIED BY 'MYPASS';
GRANT FILE ON * . * TO 'astrealtime'@'localhost' IDENTIFIED BY 'MYPASS' WITH MAX_QUERIES_PER_HOUR 0 MAX_CONNECTIONS_PER_HOUR 0 MAX_UPDATES_PER_HOUR 0 MAX_USER_CONNECTIONS 0 ;
GRANT INSERT ON `asterisk`.`cdr` TO 'astrealtime'@'localhost';
GRANT SELECT , INSERT , UPDATE , DELETE ON `asterisk`.`queue_members` TO 'astrealtime'@'localhost';
GRANT SELECT , UPDATE ON `asterisk`.`queues` TO 'astrealtime'@'localhost';
GRANT SELECT , UPDATE ON `asterisk`.`sip` TO 'astrealtime'@'localhost';
GRANT SELECT , UPDATE ON `asterisk`.`voicemail_users` TO 'astrealtime'@'localhost';
GRANT SELECT , UPDATE , INSERT , DELETE ON `asterisk`.`voicemail_messages` TO 'astrealtime'@'localhost';
Configure various files
Set up CDR to MySQL
Edit /etc/asterisk/cdr_mysql.conf[global]
hostname=localhost
dbname=asterisk
table=cdr
password=MYPASS
user=astrealtime
port=3306
sock=/var/lib/mysql/mysql.sock
userfield=1
Set up realtime
Edit res_mysql.conf[general]
dbhost = localhost
dbname = asterisk
dbuser = astrealtime
dbpass = MYPASS
dbport = 3306
dbsock = /var/lib/mysql/mysql.sock
If you are using version 1.6.0 or lower
Edit /etc/asterisk/extconfig.conf[settings]
queues => mysql,asterisk,queues
queue_members => mysql,asterisk,queue_members
sippeers => mysql,asterisk,sip
sipusers => mysql,asterisk,sip
voicemail => mysql,asterisk,voicemail_users
If you are using version 1.6.1 or higher
Edit /etc/asterisk/extconfig.conf[settings]
queues => mysql,general,queues
queue_members => mysql,general,queue_members
sippeers => mysql,general,sip
sipusers => mysql,general,sip
voicemail => mysql,general,voicemail_users
ODBC configuration (using settings from above)
/etc/odbcinst.ini
[MySQL]Description = ODBC for MySQL
Driver = /usr/lib/libmyodbc3.so
;For x64 systems
;Driver = /usr/lib64/libmyodbc3.so
Setup = /usr/lib/libodbcmyS.so
FileUsage = 1
(Note the '3' which isn't in the original sample file!)
/etc/odbc.ini
; DSN definitions[astrealtime]
Description = Asterisk realtime and other FUNC_ODBC access
Driver = MySQL
Socket = /var/lib/mysql/mysql.sock
Server = localhost
User = astrealtime
Pass = MYPASS
Database = asterisk
Option = 3
/etc/asterisk/res_odbc.conf
; Environment variables[ENV]
; Connections
[astrealtime]
enabled => yes
dsn => astrealtime
username => astrealtime
password => MYPASS
pre-connect => yes
idlecheck => 3600
/etc/asterisk/func_odbc.conf
This really depends on why you need database access from the dialplan!Setting up Asterisk on a vserver
Removed - have yet to test installation with DAHDIn
NOTE:
cspan is like yum but only to install PERL modules
Installing Voiceglue: Two Ways
There are two ways to install Voiceglue. The easy way, and the hard way. The easy was has the advantage of being, well, easy, but has the disadvantage of supporting only a small number of configurations and a small number of platforms. The hard way is, well, harder, but has the advantage of potentially being able to support any unix-y system in arbitrary configurations.
If you're fine with running Voiceglue on the same box as Asterisk and are going to run it on Ubuntu 8.04 or 8.10 or Fedora 9 or 10, then by all means try the easy method.
If you're fine with running Voiceglue on the same box as Asterisk and are going to run it on Ubuntu 8.04 or 8.10 or Fedora 9 or 10, then by all means try the easy method.
The Easy Way
The easy way is mostly automatic. Voiceglue provides a script that should get everything installed and running in one shot. Before the script can run, however, you have to do some preparation work.
Prerequisites
The prerequisites must be satisfied before installing Voiceglue.
Supported Platform
You must be installing on one of the following platforms:
- Ubuntu 8.04 (Hardy)
- Ubuntu 8.10 (Intrepid)
- Ubuntu 9.04 (Jaunty)
- Fedora 9
- Fedora 10
Asterisk Installed
You must have Asterisk installed somehow. The Voiceglue installer doesn't check for an asterisk package, so it's fine to install it from source if you want to.
Supported versions of Asterisk are:
Supported versions of Asterisk are:
- Asterisk 1.2
- Asterisk 1.4
- Asterisk 1.6
The "asterisk" user
The “asterisk” user must be present. This user is what the voiceglue process runs as because it needs to share audio files with Asterisk. It is legal, even with the easy way, to have Asterisk installed on a separate machine from Voiceglue, but the “asterisk” user must be present on the voiceglue host, and should match the uid/gid of the “asterisk” user on the Asterisk host.
Required Packages
There are several software packages that Voiceglue requires. The installer looks for them as packages in the system (debs for Ubuntu, rpms for Fedora) so they must be installed that way. For Ubuntu you use apt/synaptic, for Fedora you use yum/yumex. Here's the list of what's required on each of the supported platforms:
If an entry is blank, it means I didn't have to install that package from a base system because it was already present, so you probably won't have to either.
| Package | Ubuntu 8.04 | Ubuntu 8.10 - 9.04 | Fedora 9 or 10 | |
|---|---|---|---|---|
| gcc/g++ | gcc g++ | gcc g++ | gcc-c++ | |
| libc++ | libstdc++-devel | |||
| xerces-c | libxerces28-dev | libxerces-c2-dev | xerces-c-devel | |
| SpiderMonkey | libmozjs-dev | libmozjs-dev | xulrunner-devel | |
| flite | flite | flite | flite | |
| sox | sox | sox | sox | |
| libsox-fmt-all | libsox-fmt-all | libsox-fmt-all | ||
| wget | wget | wget | wget | |
| openssl | libssl-dev | libssl-dev | openssl-devel | |
| XML ::LibXML | libxml-libxml-perl | libxml-libxml-perl | perl- XML -LibXML | |
| BSD::Resource | libbsd-resource-perl | libbsd-resource-perl | perl-BSD-Resource | |
| Module::Build | libmodule-build-perl | libmodule-build-perl | perl-Module-Build | |
| FFTW 3 | libfftw3-dev | libfftw3-dev | fftw-devel | |
| Test::More | perl-Test-Base | |||
| pkg-config | pkg-config | pkg-config | pkgconfig | |
Download and Unpack Voiceglue
After prerequisites are installed, download and upack the voiceglue distribution. It can always be found at http://voiceglue.org by clicking on the “Download” tab at the top.
I'm assuming that downloading and unpacking a tar file is not hard for a voiceglue user. After all, you installed Asterisk.
I'm assuming that downloading and unpacking a tar file is not hard for a voiceglue user. After all, you installed Asterisk.
Running the install script
From within the top-level voiceglue directory (the one containing doc), run the following command as root:
It first checks the prerequisites listed above, then if those are satisfied, builds and installs all of the software required for Voiceglue. Check the output for errors.
After the script runs to completion,. you should have the following services ready to run with their init scripts in /etc/init.d/:
These services must be brought up in the order shown above, and brought down in the reverse order. Their install scripts will do this automatically on system startup and shutdown.
doc/install-voiceglue It first checks the prerequisites listed above, then if those are satisfied, builds and installs all of the software required for Voiceglue. Check the output for errors.
After the script runs to completion,. you should have the following services ready to run with their init scripts in /etc/init.d/:
- dynlog
- phoneglue
- voiceglue
These services must be brought up in the order shown above, and brought down in the reverse order. Their install scripts will do this automatically on system startup and shutdown.
Uninstalling voiceglue
If you want to get rid of everything that voiceglue installed (which can be useful for re-installs too in case you're using something like checkinstall to create packages and you want all files re-installed even if they didn't change) you can run the supplied uninstall script.
From within the top-level voiceglue directory (the one containing doc), run the following command as root:
From within the top-level voiceglue directory (the one containing doc), run the following command as root:
doc/uninstall-voiceglue The Hard Way
Prerequisites
The prerequisites are the same as for the easy way, except that you are not necessarily restricted to the platforms listed there, and the software packages don't necessarily need to be installed as the package format of choice for the distribution.
Voiceglue Contents
The Voiceglue distribution contains the following top-level directories:
Each of these items (except doc) must be installed.
| Directory | Contents |
|---|---|
| Cam-Scom | perl library for IPC |
| doc | documentation and install script |
| dynlog | perl programs providing unified log collection |
| libvglue | voiceglue C/C++ libraries |
| openvxi-3.4+vglue | voiceglue-modified openvxi 3.4 C/C++ library |
| phoneglue | perl program providing high-level Asterisk interface |
| Satc | perl library for phoneglue communication |
| SRGSDTMF | perl library for processing SRGS DTMF grammars |
| Vgluefftw | perl library for FFTW access |
| voiceglue | perl program providing voiceglue interface |
| Voiceglue-Conf | perl library for voiceglue configuration |
| Vxglue | perl library for interfacing to openvxi |
Installing Voiceglue
The order in which the software components must be installed is:
- Cam-Scom
- dynlog
- Vgluefftw
- Satc
- Voiceglue-Conf
- phoneglue
- SRGSDTMF
- libvglue-headers
- openvxi-3.4+vglue
- libvglue
- Vxglue
- voiceglue
Installing Perl Libraries
Each perl library can be installed with the following sequence of actions:
- Change to that directory
- Run:
perl Build.PL - Run:
./Build install
Installing Programs
Each program can be installed with the following sequence of actions:
- Change to that directory
- Determine which Makefile is appropriate for your situation
- Run:
make -f Makefile install
Installing libvglue-headers
The libvglue software is installed in two steps. The first step installs just the headers:
- Change to that directory
- Run:
make install-headers
Installing libvglue
When it's time to install libvglue binaries, do:
- Change to that directory
- Run:
make install
Installing openvxi-3.4+vglue
This is the most challenging install step, as it consists of a large number of C/C++ modules that have dependencies on several system libraries.
First, look at the
Next, look at the
Finally, the
First, look at the
exports file at the top level. It contains the following definitions: SWISBSDK- The top-level directory of OpenVXIXERCESDIR- The directory containing the Xerces-C distributionSPIDERMONKEYDIR- The directory containing the Mozilla SpiderMonkey distributionJSCFLAGS- The CFLAGS used for compiling against SpiderMonkeyJSLIBFLAGS- The library flags for linking against SpiderMonkey
Next, look at the
build-openvxi script in the same top-level directory. It encodes the steps to build OpenVXI. Hopefully, with proper settings in exports, it will run successfully. Finally, the
install-openvxi script in the same top-level directory installs the compiled OpenVXI library files and runtime support files to their system destinations. NOTE:
Enable Manager in /etc/astrisk/manager.conf by making " enable=yes " (so that manager will enable)
how tostart VNCserver
Overview of VNC
VNC, or Virtual Networked Computing, is a way of controlling a remote computer just as though you are sitting in front of it. In the Windows world it
is also known as remote desktop but it's normally referred to as VNC in the Linux world. All that happens is that you connect using a VNC client to a
remote computer running the VNC server, then an image of the remote desktop is transmitted to your local computer and you can see and control the desktop
just as though you are there since all keyboard and mouse commands are sent from your client machine to the server.
Gnome Remote Desktop
If you are running the Gnome desktop on Fedora Core then you already have a VNC server built in. Click on the Fedora icon > Desktop > Preferences >
Remote Desktop to open the dialog shown.
Gnome remote desktop
The screen is pretty self explanatory but basically when set up this way another computer can connect to your computer using the command listed on
the dialog. There are a few important things to note, you must open port 5900 on the server for this to work since by default the Gnome Remote
Desktop (called vino) listens on this port, also the person connecting will see the same session that you are currently logged in as. This means that
any programs you have open will also be visible to the client, of course this is very useful if you are helping someone remotely.
A more flexible way to use VNC is to install the VNC server and client software via yum, these are rpm's based on
RealVNC.
vncserver and vncviewer
Check what's installed
First check if you already have them installed on your system, open a terminal and type:
$ rpm -qa|grep vnc
vnc-server-4.1.1-36
vnc-4.1.1-36
If you get an output something like this then you're all ready, if not you need to install them via yum.
Add a user(s)
Next we need to add at least 1 VNC user, open the file /etc/sysconfig/vncservers as root and add the information shown:
$ vi /etc/sysconfig/vncservers
# The VNCSERVERS variable is a list of display:user pairs.
#
# Uncomment the lines below to start a VNC server on display :2
# as my 'myusername' (adjust this to your own). You will also
# need to set a VNC password; run 'man vncpasswd' to see how
# to do that.
#
# DO NOT RUN THIS SERVICE if your local area network is
# untrusted! For a secure way of using VNC, see
#.
# Use "-nolisten tcp" to prevent X connections to your VNC server via TCP.
# Use "-nohttpd" to prevent web-based VNC clients connecting.
# Use "-localhost" to prevent remote VNC clients connecting except when
# doing so through a secure tunnel. See the "-via" option in the
# `man vncviewer' manual page.
VNCSERVERS="1:bobpeers"
VNCSERVERARGS[1]="-geometry 1024x768 -depth 16"
The important part is the VNCSERVERS="1:bobpeers", this sets up a users for the vnc server, you can add as many as you like here. The VNCSERVERARGS[1]
line refers to the arguments for user 1, in this case the only user. Geometry sets the size and depth sets the colour depth, you can adjust these to
suit your preferences but in my case the client machine has a resolution of 1024x768 and the depth 16 makes the connection a bit faster since the less
information that needs to be sent the more responsive the session will feel.
Knowing which port to use
It's also important to note the session number user as this will tell us which port vncserver will listen on. Remember the Gnome Remote Desktop
asked us to use computername:0 as the connection string, the number needs to be added to 5900 to get the listening port. In this case we need to use
port 5901 since we are using session 1. In the same way we could use any number, for example:
VNCSERVERS="2000:bobpeers"
VNCSERVERARGS[2000]="-geometry 1024x768 -depth 16"
In this case we need to use port 5900+2000 so port 7900.
Setting a password
To add some security we need to add a password that must be given before a connection can be established, open a terminal and type:
$ vncpasswd
Password:
Verify:
This creates a hidden folder called .vnc in your home folder containing the password file.
Starting the server and startup options
To start the server we type the command 'vncserver' and the session you wish to start (if you have set up more than 1 entry in the
/etc/sysconfig/vncservers file:
$ vncserver :1
Starting VNC server: 1:bobpeers
New 'linux.bobpeers:1 (bobpeers)' desktop is linux.bobpeers:1
Starting applications specified in /home/bobuser/.vnc/xstartup
Log file is /home/bobuser/.vnc/linux.bobpeers:1.log
[ OK ]
Now the server is started and a user could connect, however they will get a plain grey desktop by default as the connection will not cause a new
session of X to start by default, to fix this we need to edit the startup script in the .vnc folder in your home directory.
$ vi ~/.vnc/xstartup
#!/bin/sh
# Uncomment the following two lines for normal desktop:
unset SESSION_MANAGER
exec /etc/X11/xinit/xinitrc
[ -x /etc/vnc/xstartup ] && exec /etc/vnc/xstartup
[ -r $HOME/.Xresources ] && xrdb $HOME/.Xresources
xsetroot -solid grey
vncconfig -iconic &
xterm -geometry 80x24+10+10 -ls -title "$VNCDESKTOP Desktop" &
twm &
As the file says make sure the two lines at the top are uncommented by removing the leading # sign. Next we need to restart vncserver to pick up
the changed we just made. To restart the vncserver we need to kill the process and start a new one as root:
$ vncserver -kill :1
Killing Xvnc process ID 13728
$ vncserver :1
Starting VNC server: 1:bobpeers
New 'linux.bobpeers:1 (bobpeers)' desktop is linux.bobpeers:1
Starting applications specified in /home/bobuser/.vnc/xstartup
Log file is /home/bobuser/.vnc/linux.bobpeers:1.log
[ OK ]
Using vncviewer
To start the viewer type:
$ vncviewer localhost:5901
This open a dialog as shown for us to enter our password we set earlier, enter the password and you should now see a copy of your desktop. Note
that unlike the Gnome Remote Desktop this has started a new session of X so any applications open on the host machine are not visible to the new
session, it's basically a whole new logon running at the same time.
If you just type 'vncviewer' at the prompt then you will asked for the host to connect to, then you can type localhost:5901 for example.
Remember to use the correct port number when connecting, if you set your VNCSERVERS to be 2000:myname then you would need to connect on localhost:7900.
VNCVIEWER logon
Stopping the vncserver
There are two ways to stop the server, either as root:
$ /sbin/service vncserver stop
Shutting down VNC server: 1:bobpeers [ OK ]
or you can explicitly kill a particular session without being root:
$ vncserver -kill :1
Killing Xvnc process ID 13728
Just replace the 1 with the vnc session you wish to stop.
Allowing remote connections
So far we have only connected to our own computer using localhost so we have not needed to open any ports in the firewall, however if we want to
allow remote connection we will have to do the following. This can either be done from the command line or using system-config-security if you have
it installed.
Using system-config-security to opens ports.
First we'll look into the GUI system-config-security. Go to the Fedora start menu > Desktop > Administration >
Security Level and Firewall, then type your root password when prompted to see this:
system-config-security
Click on other ports at the bottom and enter the port you wish to open, 5901 in my case, select tcp, then click OK and OK again to save your
settings. That's all there is to it, but remember to close the port again when you are finished.
Select the port to open
Editing the iptables manually to opens ports.
To do the same from the command line add the line in bold to the file /etc/sysconfig/iptables while logged in as root:
# Firewall configuration written by system-config-securitylevel
# Manual customization of this file is not recommended.
*filter
:INPUT ACCEPT [0:0]
:FORWARD ACCEPT [0:0]
:OUTPUT ACCEPT [0:0]
:RH-Firewall-1-INPUT - [0:0]
-A INPUT -j RH-Firewall-1-INPUT
-A FORWARD -j RH-Firewall-1-INPUT
-A RH-Firewall-1-INPUT -i lo -j ACCEPT
-A RH-Firewall-1-INPUT -p icmp --icmp-type any -j ACCEPT
-A RH-Firewall-1-INPUT -p 50 -j ACCEPT
-A RH-Firewall-1-INPUT -p 51 -j ACCEPT
-A RH-Firewall-1-INPUT -p udp --dport 5353 -d 224.0.0.251 -j ACCEPT
-A RH-Firewall-1-INPUT -p udp -m udp --dport 631 -j ACCEPT
-A RH-Firewall-1-INPUT -p tcp -m tcp --dport 631 -j ACCEPT
-A RH-Firewall-1-INPUT -m state --state ESTABLISHED,RELATED -j ACCEPT
-A RH-Firewall-1-INPUT -m state --state NEW -m tcp -p tcp --dport 5901 -j ACCEPT
-A RH-Firewall-1-INPUT -j REJECT --reject-with icmp-host-prohibited
COMMIT
Finally we need to restart the iptables service to reload the changes.
$ sudo /sbin/service iptables restart
Flushing firewall rules: [ OK ]
Setting chains to policy ACCEPT: filter [ OK ]
Unloading iptables modules: [ OK ]
Applying iptables firewall rules: [ OK ]
Loading additional iptables modules: ip_conntrack_netbios_n[ OK ]
Connecting from the remote machine.
Now from the remote client computer start up vncviewer but this time use the IP address of the host computer followed by the port number. So on my
home network this might be:
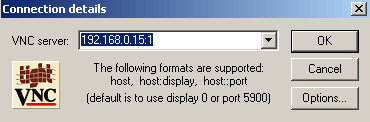
$ vncviewer 192.168.1.105:5901
You should see a copy of the hosts desktop, if things seem a bit slow you can try adjusting the colour depth or screen resolution on the vncserver
to see if that helps.
METHOD 2::::
So what did we do there? First, we started the vncserver service. It may or may not have already been running on your system. Next we set a password to access the VNC desktop. When you set the password, you will not see any characters on the screen, and you must enter the password twice. You will only need to do this the very first time you run vncserver. The password will be saved in the Linux filesystem, and you can change it at any time by invoking the vncpasswd command again. Last, to activate the VNC desktop, we simply invoked the vncserver command. Notice the output; the desktop is named "roswell:1" which can also be replaced via the machines IP address.
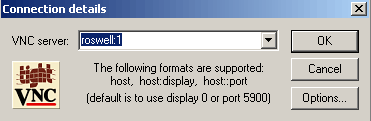
You can replace the server name with an IP address if you are logging in from outside your LAN. Remember, if you are using NAT port 5900 must be forwarded to your VNCserver.
Upon successful connection, you will be prompted for a password. You will then see a terminal screen that will allow you to execute commands:

First, we are going to assume that VNCserver is running under the root user, as shown with the example above. For this example, I will be editing my VNCserver to enter Gnome. You can specify a KDE desktop if you have KDE installed on your server. Make sure you are in the root directory.
Using vi (vim) to edit the xstartup file, make sure your file matches this one:
Notice that the last line is "startx &" as this command will launch Gnome upon login via VNCserver. If you are using a KDE desktop, the line "startkde &" should replace the last line.
Logging in, you will be presented with a Gnome or KDE desktop.
VNC, or Virtual Networked Computing, is a way of controlling a remote computer just as though you are sitting in front of it. In the Windows world it
is also known as remote desktop but it's normally referred to as VNC in the Linux world. All that happens is that you connect using a VNC client to a
remote computer running the VNC server, then an image of the remote desktop is transmitted to your local computer and you can see and control the desktop
just as though you are there since all keyboard and mouse commands are sent from your client machine to the server.
Gnome Remote Desktop
If you are running the Gnome desktop on Fedora Core then you already have a VNC server built in. Click on the Fedora icon > Desktop > Preferences >
Remote Desktop to open the dialog shown.
Gnome remote desktop
The screen is pretty self explanatory but basically when set up this way another computer can connect to your computer using the command listed on
the dialog. There are a few important things to note, you must open port 5900 on the server for this to work since by default the Gnome Remote
Desktop (called vino) listens on this port, also the person connecting will see the same session that you are currently logged in as. This means that
any programs you have open will also be visible to the client, of course this is very useful if you are helping someone remotely.
A more flexible way to use VNC is to install the VNC server and client software via yum, these are rpm's based on
RealVNC.
vncserver and vncviewer
Check what's installed
First check if you already have them installed on your system, open a terminal and type:
$ rpm -qa|grep vnc
vnc-server-4.1.1-36
vnc-4.1.1-36
If you get an output something like this then you're all ready, if not you need to install them via yum.
Add a user(s)
Next we need to add at least 1 VNC user, open the file /etc/sysconfig/vncservers as root and add the information shown:
$ vi /etc/sysconfig/vncservers
# The VNCSERVERS variable is a list of display:user pairs.
#
# Uncomment the lines below to start a VNC server on display :2
# as my 'myusername' (adjust this to your own). You will also
# need to set a VNC password; run 'man vncpasswd' to see how
# to do that.
#
# DO NOT RUN THIS SERVICE if your local area network is
# untrusted! For a secure way of using VNC, see
#
# Use "-nolisten tcp" to prevent X connections to your VNC server via TCP.
# Use "-nohttpd" to prevent web-based VNC clients connecting.
# Use "-localhost" to prevent remote VNC clients connecting except when
# doing so through a secure tunnel. See the "-via" option in the
# `man vncviewer' manual page.
VNCSERVERS="1:bobpeers"
VNCSERVERARGS[1]="-geometry 1024x768 -depth 16"
The important part is the VNCSERVERS="1:bobpeers", this sets up a users for the vnc server, you can add as many as you like here. The VNCSERVERARGS[1]
line refers to the arguments for user 1, in this case the only user. Geometry sets the size and depth sets the colour depth, you can adjust these to
suit your preferences but in my case the client machine has a resolution of 1024x768 and the depth 16 makes the connection a bit faster since the less
information that needs to be sent the more responsive the session will feel.
Knowing which port to use
It's also important to note the session number user as this will tell us which port vncserver will listen on. Remember the Gnome Remote Desktop
asked us to use computername:0 as the connection string, the number needs to be added to 5900 to get the listening port. In this case we need to use
port 5901 since we are using session 1. In the same way we could use any number, for example:
VNCSERVERS="2000:bobpeers"
VNCSERVERARGS[2000]="-geometry 1024x768 -depth 16"
In this case we need to use port 5900+2000 so port 7900.
Setting a password
To add some security we need to add a password that must be given before a connection can be established, open a terminal and type:
$ vncpasswd
Password:
Verify:
This creates a hidden folder called .vnc in your home folder containing the password file.
Starting the server and startup options
To start the server we type the command 'vncserver' and the session you wish to start (if you have set up more than 1 entry in the
/etc/sysconfig/vncservers file:
$ vncserver :1
Starting VNC server: 1:bobpeers
New 'linux.bobpeers:1 (bobpeers)' desktop is linux.bobpeers:1
Starting applications specified in /home/bobuser/.vnc/xstartup
Log file is /home/bobuser/.vnc/linux.bobpeers:1.log
[ OK ]
Now the server is started and a user could connect, however they will get a plain grey desktop by default as the connection will not cause a new
session of X to start by default, to fix this we need to edit the startup script in the .vnc folder in your home directory.
$ vi ~/.vnc/xstartup
#!/bin/sh
# Uncomment the following two lines for normal desktop:
unset SESSION_MANAGER
exec /etc/X11/xinit/xinitrc
[ -x /etc/vnc/xstartup ] && exec /etc/vnc/xstartup
[ -r $HOME/.Xresources ] && xrdb $HOME/.Xresources
xsetroot -solid grey
vncconfig -iconic &
xterm -geometry 80x24+10+10 -ls -title "$VNCDESKTOP Desktop" &
twm &
As the file says make sure the two lines at the top are uncommented by removing the leading # sign. Next we need to restart vncserver to pick up
the changed we just made. To restart the vncserver we need to kill the process and start a new one as root:
$ vncserver -kill :1
Killing Xvnc process ID 13728
$ vncserver :1
Starting VNC server: 1:bobpeers
New 'linux.bobpeers:1 (bobpeers)' desktop is linux.bobpeers:1
Starting applications specified in /home/bobuser/.vnc/xstartup
Log file is /home/bobuser/.vnc/linux.bobpeers:1.log
[ OK ]
Using vncviewer
To start the viewer type:
$ vncviewer localhost:5901
This open a dialog as shown for us to enter our password we set earlier, enter the password and you should now see a copy of your desktop. Note
that unlike the Gnome Remote Desktop this has started a new session of X so any applications open on the host machine are not visible to the new
session, it's basically a whole new logon running at the same time.
If you just type 'vncviewer' at the prompt then you will asked for the host to connect to, then you can type localhost:5901 for example.
Remember to use the correct port number when connecting, if you set your VNCSERVERS to be 2000:myname then you would need to connect on localhost:7900.
VNCVIEWER logon
Stopping the vncserver
There are two ways to stop the server, either as root:
$ /sbin/service vncserver stop
Shutting down VNC server: 1:bobpeers [ OK ]
or you can explicitly kill a particular session without being root:
$ vncserver -kill :1
Killing Xvnc process ID 13728
Just replace the 1 with the vnc session you wish to stop.
Allowing remote connections
So far we have only connected to our own computer using localhost so we have not needed to open any ports in the firewall, however if we want to
allow remote connection we will have to do the following. This can either be done from the command line or using system-config-security if you have
it installed.
Using system-config-security to opens ports.
First we'll look into the GUI system-config-security. Go to the Fedora start menu > Desktop > Administration >
Security Level and Firewall, then type your root password when prompted to see this:
system-config-security
Click on other ports at the bottom and enter the port you wish to open, 5901 in my case, select tcp, then click OK and OK again to save your
settings. That's all there is to it, but remember to close the port again when you are finished.
Select the port to open
Editing the iptables manually to opens ports.
To do the same from the command line add the line in bold to the file /etc/sysconfig/iptables while logged in as root:
# Firewall configuration written by system-config-securitylevel
# Manual customization of this file is not recommended.
*filter
:INPUT ACCEPT [0:0]
:FORWARD ACCEPT [0:0]
:OUTPUT ACCEPT [0:0]
:RH-Firewall-1-INPUT - [0:0]
-A INPUT -j RH-Firewall-1-INPUT
-A FORWARD -j RH-Firewall-1-INPUT
-A RH-Firewall-1-INPUT -i lo -j ACCEPT
-A RH-Firewall-1-INPUT -p icmp --icmp-type any -j ACCEPT
-A RH-Firewall-1-INPUT -p 50 -j ACCEPT
-A RH-Firewall-1-INPUT -p 51 -j ACCEPT
-A RH-Firewall-1-INPUT -p udp --dport 5353 -d 224.0.0.251 -j ACCEPT
-A RH-Firewall-1-INPUT -p udp -m udp --dport 631 -j ACCEPT
-A RH-Firewall-1-INPUT -p tcp -m tcp --dport 631 -j ACCEPT
-A RH-Firewall-1-INPUT -m state --state ESTABLISHED,RELATED -j ACCEPT
-A RH-Firewall-1-INPUT -m state --state NEW -m tcp -p tcp --dport 5901 -j ACCEPT
-A RH-Firewall-1-INPUT -j REJECT --reject-with icmp-host-prohibited
COMMIT
Finally we need to restart the iptables service to reload the changes.
$ sudo /sbin/service iptables restart
Flushing firewall rules: [ OK ]
Setting chains to policy ACCEPT: filter [ OK ]
Unloading iptables modules: [ OK ]
Applying iptables firewall rules: [ OK ]
Loading additional iptables modules: ip_conntrack_netbios_n[ OK ]
Connecting from the remote machine.
Now from the remote client computer start up vncviewer but this time use the IP address of the host computer followed by the port number. So on my
home network this might be:
$ vncviewer 192.168.1.105:5901
You should see a copy of the hosts desktop, if things seem a bit slow you can try adjusting the colour depth or screen resolution on the vncserver
to see if that helps.
METHOD 2::::
What is VNCserver?
VNC stands for Virtual Network Computing. It was originally developed by AT&T as a way to administer machines without using the console. If you have used Windows Terminal Services (RDP), VNC will seem very familiar.Why use VNCserver?
In Linux, everything can be done from a shell. However, there may be a time when you need to access the machine as if you were at the console.Getting Started
You will need several things to get started:- root privledges
- VNC client software (tightVNC, you can download it here.)
- A good password!
[root@roswell etc]# service vncserver start
Starting VNC server:                                       [  OK  ]
[root@roswell etc]#
[root@roswell etc]# vncpasswd
Password:
Verify:
[root@roswell etc]#
[root@roswell etc]# vncserver

New 'roswell:1 (root)' desktop is roswell:1

Starting applications specified in /root/.vnc/xstartup
Log file is /root/.vnc/roswell:1.log

[root@roswell etc]#
So what did we do there? First, we started the vncserver service. It may or may not have already been running on your system. Next we set a password to access the VNC desktop. When you set the password, you will not see any characters on the screen, and you must enter the password twice. You will only need to do this the very first time you run vncserver. The password will be saved in the Linux filesystem, and you can change it at any time by invoking the vncpasswd command again. Last, to activate the VNC desktop, we simply invoked the vncserver command. Notice the output; the desktop is named "roswell:1" which can also be replaced via the machines IP address.
Connecting
Assuming you already installed TightVNC or another VNC client, enter the desktop name: You can replace the server name with an IP address if you are logging in from outside your LAN. Remember, if you are using NAT port 5900 must be forwarded to your VNCserver.
Upon successful connection, you will be prompted for a password. You will then see a terminal screen that will allow you to execute commands:
VNCserver in Runlevel 5 (KDE or Gnome)
If you are new to linux, running VNC server with a terminal isn't going to do you much good. You might want to have a menu-driven GUI like Windows. No problem. Follow these steps:First, we are going to assume that VNCserver is running under the root user, as shown with the example above. For this example, I will be editing my VNCserver to enter Gnome. You can specify a KDE desktop if you have KDE installed on your server. Make sure you are in the root directory.
[root@roswell ~]# ls -a
.                                   cacti-0.8.6c.tar.gz  .gnome2_private     .lftp                  queue.dat          temp
..                                  client.cfg           .gnupg              machinedependent.dat  .recently-used      Templates
.config                             FAHlog-Prev.txt      .gstreamer-0.8      .metacity             .rhn-applet.cache  .themes
.cshrc                              FAHlog.txt           .gtkrc              .mozilla              .rhn-applet.conf   .thumbnails
.bash_history                       Desktop              .fonts.cache-1      .gtkrc-1.2-gnome2     .rnd               .Trash
.bash_logout                        .dmrc                .gconf              .ICEauthority         .mysql_history      scripts
.bash_profile                       .eggcups             .gconfd             .icons                .nautilus          .sh_history
.viminfo
           .bashrc              .bashdevl           .esd_auth             .gnome              php-4.11
.ssh                                .vnc                  cacti-0.8.6c       .gnome2                install.log
[root@roswell ~]# cd .vnc
[root@roswell .vnc]# ls
passwd         roswell:1.pid  roswell:2.pid  roswell:3.pid  roswell:4.pid  roswell:5.pid             roswell.area51.lan:1.pid
roswell:1.log  roswell:2.log  roswell:3.log  roswell:4.log  roswell:5.log  roswell.area51.lan:1.log  roswell.area51.lan:2.log
xstartup
[root@roswell .vnc]# vi xstartup
Using vi (vim) to edit the xstartup file, make sure your file matches this one:
#!/bin/sh

# Uncomment the following two lines for normal desktop:
unset SESSION_MANAGER
exec /etc/X11/xinit/xinitrc

[ -x /etc/vnc/xstartup ] && exec /etc/vnc/xstartup
[ -r $HOME/.Xresources ] && xrdb $HOME/.Xresources
xsetroot -solid grey
vncconfig -iconic &
xterm -geometry 80x24+10+10 -ls -title "$VNCDESKTOP Desktop" &
startx &
Notice that the last line is "startx &" as this command will launch Gnome upon login via VNCserver. If you are using a KDE desktop, the line "startkde &" should replace the last line.
Logging in, you will be presented with a Gnome or KDE desktop.
Step by Step Installing Oracle Database 10g Release 2 on Linux (CentOS) and AUTOMATE the installation using Linux Shell Script
In order to use Oracle Database, first of all we need to setup Oracle Software. Installation of Oracle Database on Windows is very easy. By running setup.exe from installation CD of Oracle for Windows, we can invoke a setup and by clicking NEXT buttons we can install Oracle Software and Database without any problem. We don’t need any prerequisite actions before installation. But in Linux it’s different. If we want to install Oracle Database on Linux OS, we should follow some prerequisite actions.
Today, we’re going to install Oracle Database on CentOS. To do it, we use last version of CentOS (the latest release for now) – “CentOS-5.2” and mostly used release of Oracle Database – “Oracle Database 10g Release 2”. And we’re going to practice this whole project on VMware 6.0.0
Before starting, we need to install VMware. Then, we need to install CentOS on VMware. After that, we are going to install Oracle Database. You should refer to my previous posts in order to install VMware and Centos
Step by step installing VMware
Step by Step Installing CentOS on VMware
But there’s one thing we should keep in mind. During installation of CentOS, on the “package lists” page, we should behave differently. It will be discussed in the next paragraphs.
This project covers following steps:
1. Checking minimum hardware requirements
2. Installing rpm packages which are required for Oracle installation
3. Configuring kernel parameters
4. Creating groups and user for Oracle Installation
5. Installing Oracle Software
6. Creating an Oracle Database
7. Connecting to Database with Enterprise Manager
8. AUTOMATING all processes and steps of installation Oracle 10g R2 on Centos using Shell Script
As you see from the list above, in order to setup Oracle Database, we need to change some parameters in the system. Changing these parameters each time could lead to mistakes and waste of time. The main purpose of our article is to automate all these processes and save your time. For this purpose we’re going to use “Shell Script”
Now I’m going to explain above mentioned steps one by one
1. Checking minimum hardware requirements
At least, your system should meet the following requirements:
- 1GB RAM
- Requirement for swap space in Oracle installation is as follows:
Available RAM Swap Space Required
Between 1 GB and 2 GB 1.5 times the size of RAM
Between 2 GB and 8 GB Equal to the size of RAM
More than 8 GB .75 times the size of RAM
- 400MB free space in /tmp directory
- Depending on type of the installation, 1.5-3.5 GB free space for Oracle Software
- 1.5GB free space if new Oracle Database is created
Getting familiar with requirements mentioned above, we need to get hardware information of our system. To check the size of RAM, Swap space and tmp directory, we run these commands:
- To check the size of physical memory, execute grep MemTotal /proc/meminfo
- To check the size of swap space, execute grep SwapTotal /proc/meminfo
- To check the space in /tmp directory, execute df –h /tmp
2. Installing rpm packages which are required for Oracle installation
While installing CentOS, we have to install some rpm packages. During the installation, on the installation window you get list of packages. Here, we select “Customize” choice
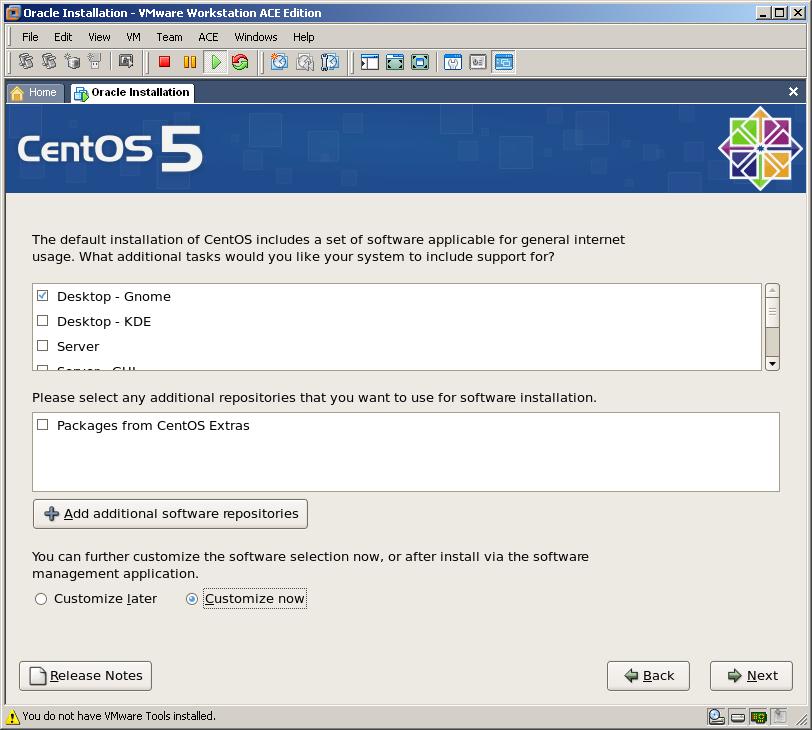
On “Customized” window, we check required packages and uncheck packages that are not required for Oracle Installation
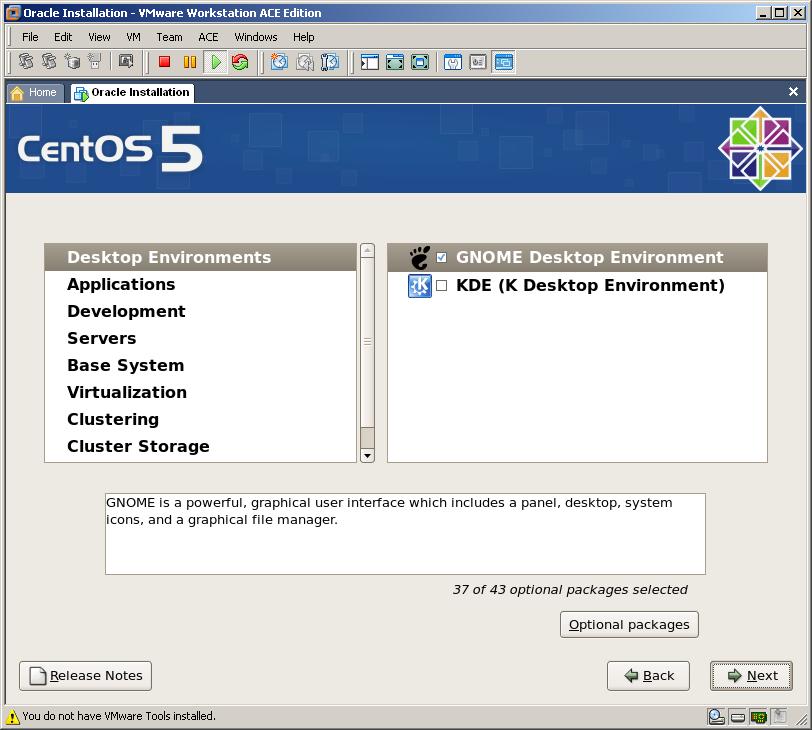
In the packages list, check following packages. Uncheck all packages that are not in the list below
Desktop Environments
GNOME Desktop Environment
Applications
Graphical Internet
Development
Development Libraries
Development Tools
GNOME Software Development
Java Development
Legacy Software Development
X Software Development
Servers
Server Configuration Tools
Web Server
Windows File Server
Base System
Administration Tools
Base
Java
Legacy Software Support
System Tools
X Window System
Furthermore, after installation of CentOS, we have manually to install these four rpm packages. Surely, you can select them (except libaio-devel package) from the package list during setup, for many people who don’t want to find these packages in the package list, installing it manually after system installation is the best option. These are packages which should be installed before Oracle installation
- compat-db-4.2.52-5.1.i386.rpm
- sysstat-7.0.2-1.el5.i386.rpm
- libaio-devel-0.3.106-3.2.i386.rpm
- libXp-1.0.0-8.1.el5.i386.rpm
In order to install these packages, you can use rpm –Uvh command by changing directory to CentOS directory inside the CD (DVD) of CentOS installation as shown below
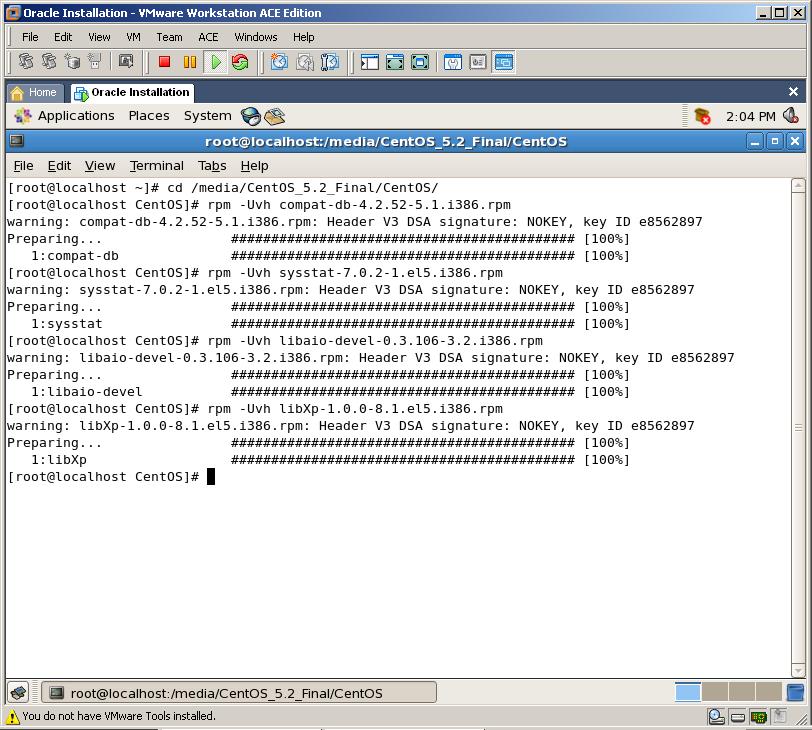
3. Changes to be made to Kernel parameters
After installing above mentioned packages, we need to change some Kernel parameters and make them match to Oracle requirements. Parameters which should be changed are shown below
| shmmax | 2147483648 |
| shmmni | 4096 |
| shmall | 2097152 |
| shmmin | 1 |
| semmsl | 250 |
| semmns | 32000 |
| semopm | 100 |
| semmni | 128 |
| file-max | 65536 |
| ip_local_port_range | 1024 65000 |
| rmem_default | 1048576 |
| rmem_max | 1048576 |
| wmem_default | 262144 |
| wmem_max | 262144 |
We do all these changes in the /etc/sysctl.conf file by adding these lines to that file:
kernel.shmmax = 2147483648
kernel.shmall = 2097152
kernel.shmmni=4096
kernel.sem=250 32000 100 128
fs.file-max=65536
net.ipv4.ip_local_port_range=1024 65000
net.core.rmem_default=1048576
net.core.rmem_max=1048576
net.core.wmem_default=262144
net.core.wmem_max=262144
After appending those lines we save that file and run the following command to make these changes effective immediately in the running system
/sbin/sysctl –p

Setting Shell limits for the Oracle UserTo improve the performance of the software on Linux systems, you must increase the following shell limits for the oracle user:
1. Add the following lines to /etc/security/limits.conf file
oracle soft nproc 2047
oracle hard nproc 16384
oracle soft nofile 1024
oracle hard nofile 65536
2. Add the following lines to /etc/pam.d/login file
session required /lib/security/pam_limits.so
session required pam_limits.so
3. In order to use Oracle Software, we need to make a change in “oracle” user’s buffer size and number of opened file descriptors. In order to do it, we add below lines to /etc/profilefile
if [ $USER = "oracle" ]; then
if [ $SHELL = "/bin/ksh" ]; then
ulimit -p 16384
ulimit -n 65536
else
ulimit -u 16384 -n 65536
fi
fi
4. Changing redhat-release file
One of the first checks performed by the Oracle Universal Installer (OUI) is to determine if the host platform is supported. The OUI uses the file /etc/redhat-release to determine the platform. For the case of Red Hat Enterprise Linux, Oracle Database 10g Release 2 expects either RHEL 3 or RHEL/OEL 4.
The easiest way to get around this error is to modify the /etc/redhat-release file replacing the current release information (CentOS release 5 (Final)) with the following:
redhat-4
Before modifying /etc/redhat-release, make a backup copy of the file and ensure to replace the original one after the Oracle installation and patch process has been completed.
cp /etc/redhat-release /etc/redhat-release.original
echo “redhat-4″ > /etc/redhat-release
After all these configurations, you should get this result:
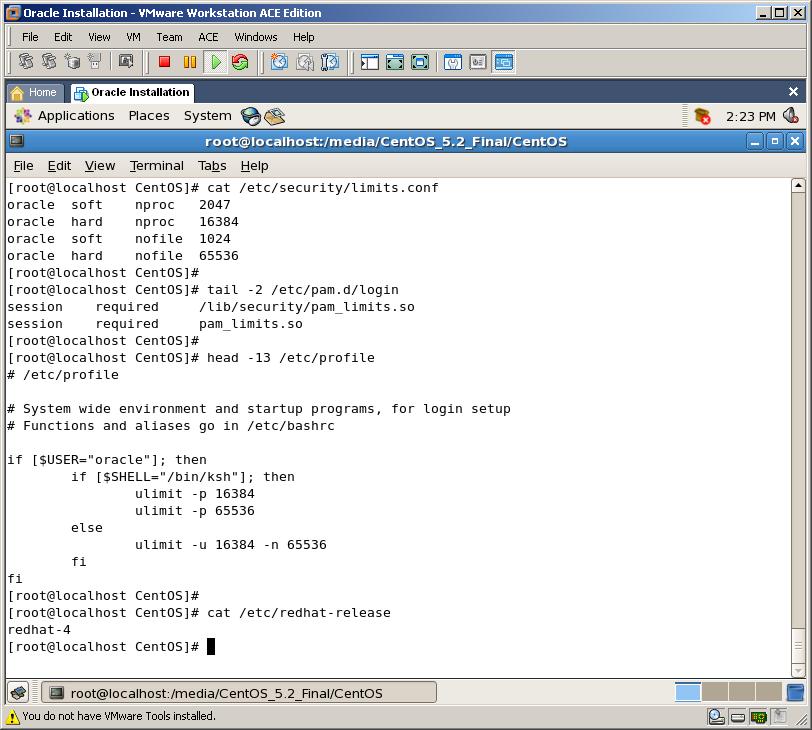
4. Create groups and user for Oracle Installation
In this step, we create “oinstall” and “dba” groups and “oracle” user to install Oracle Software, and create new Database
groupadd oinstall
groupadd dba
useradd -m -g oinstall -G dba -d /home/oracle -s /bin/bash -c “Oracle Software Owner” oracle
passwd oracle

5. Installing Oracle Database 10g Release 2
First of all, we need to download Oracle Database 10g R2. To download it, use this link:
http://download.oracle.com/otn/linux/oracle10g/10201/10201_database_linux32.zip
After download finish, we need to copy this file to the Virtual Machine. To copy it, we have two choices:
- Copy it using USB Flash Drive
- Copy it using Samba service
- Create an image file (.iso) from zipped installation and mount it to Virtual Machine
Here, we’re going to copy the zipped file using second technique. With any ISO creator program, create .iso file from zipped installation file of Oracle Database. And then mount it to the Virtual Machine as shown below:
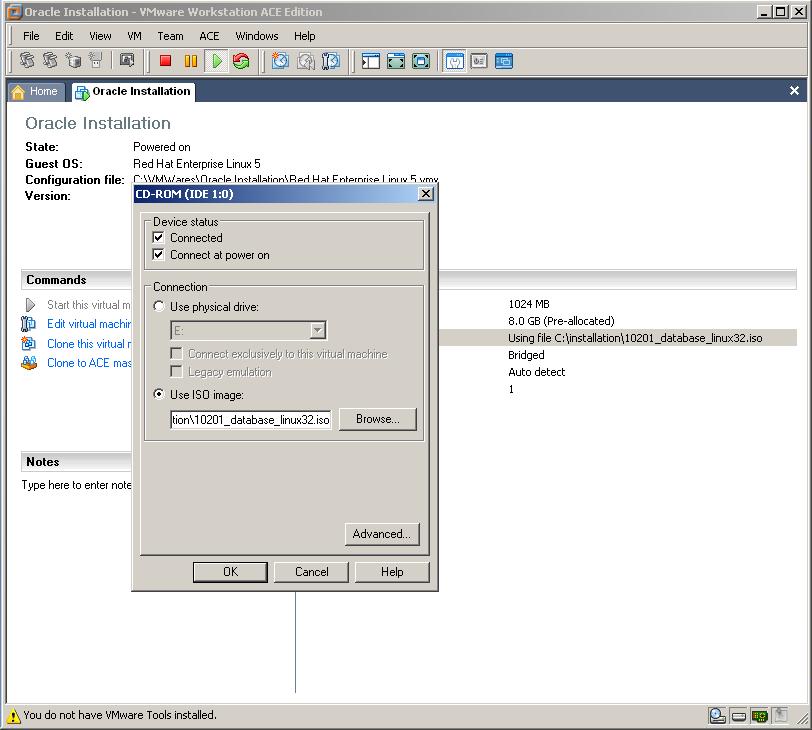
Now switch to the desktop of CentOS, right click on DVD of CentOS installation on the desktop and click “Eject” as shown below:
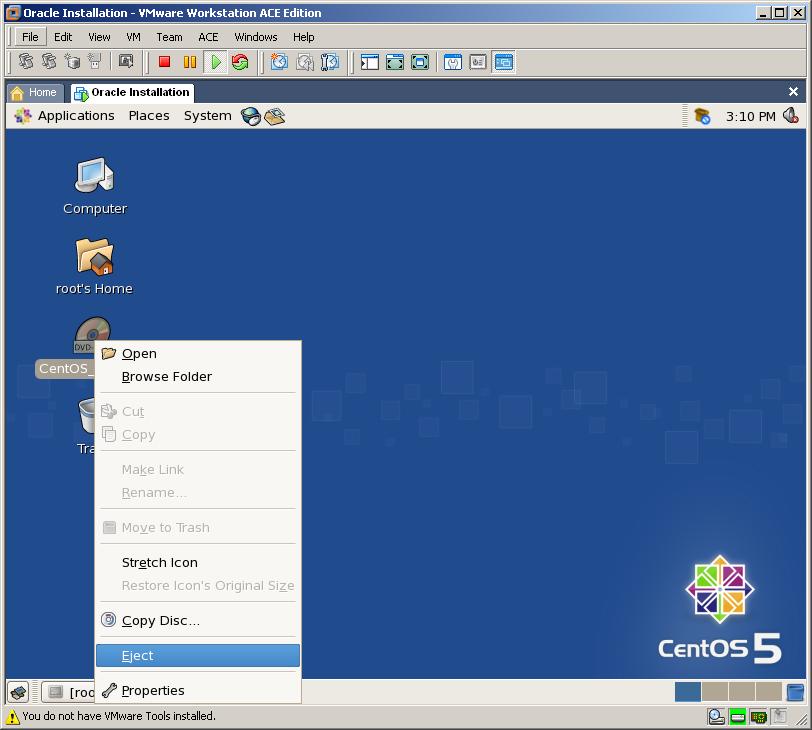
Now enter to “Computer” and double click on “CD-ROM” icon.
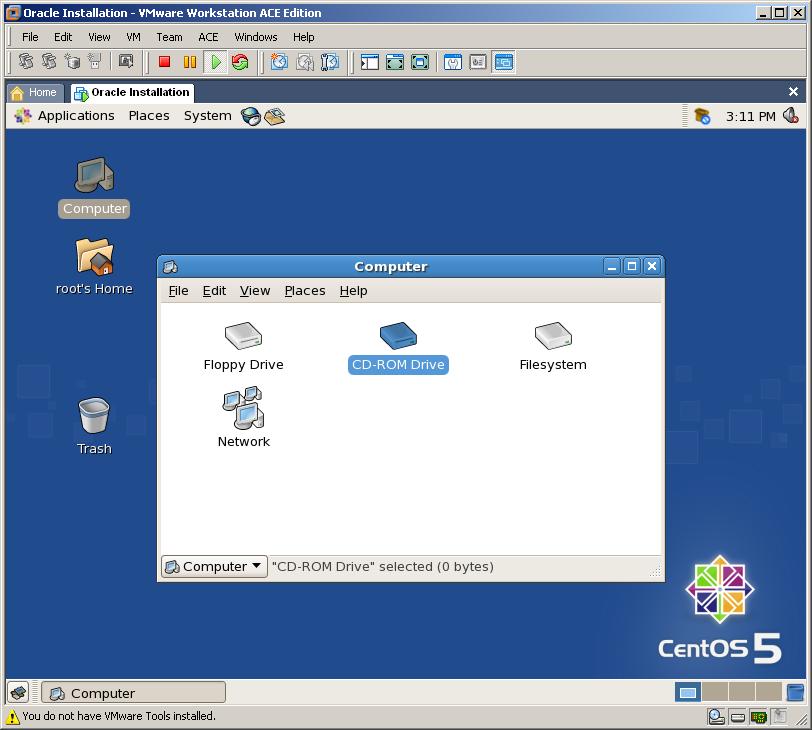
Installation file of Oracle Database will be opened:
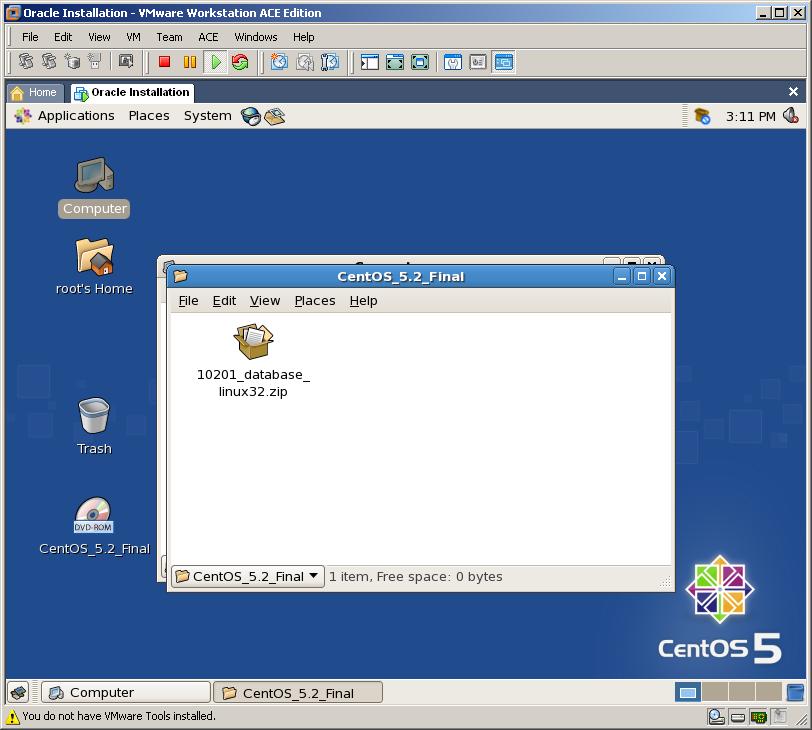
Now, create install folder on the /tmp directory, change owner of this folder to “oracle”, copy this file into /tmp/install directory
Then unzip this file and begin installation as follows:
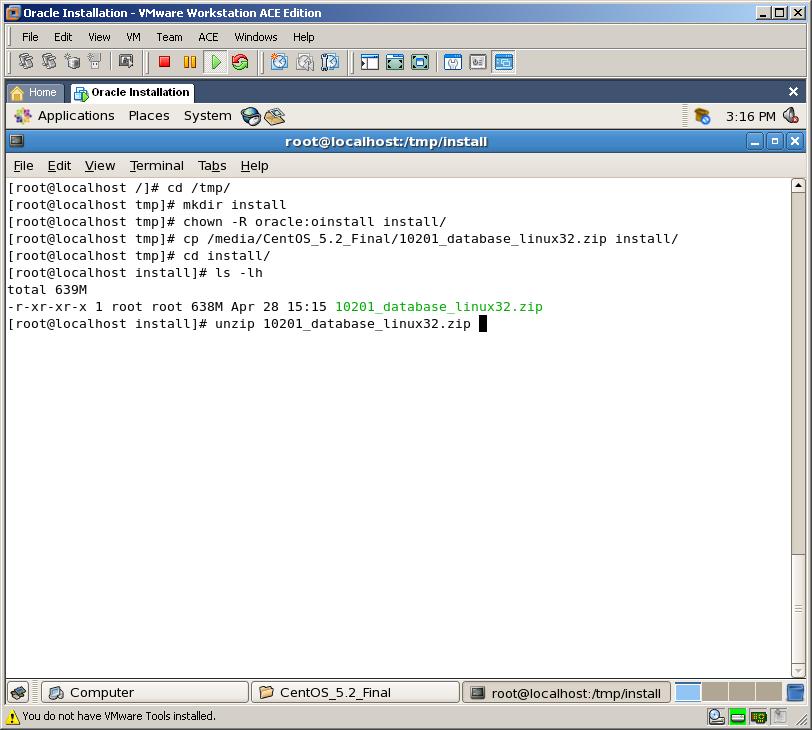
After unzip completes, installation will begin automatically
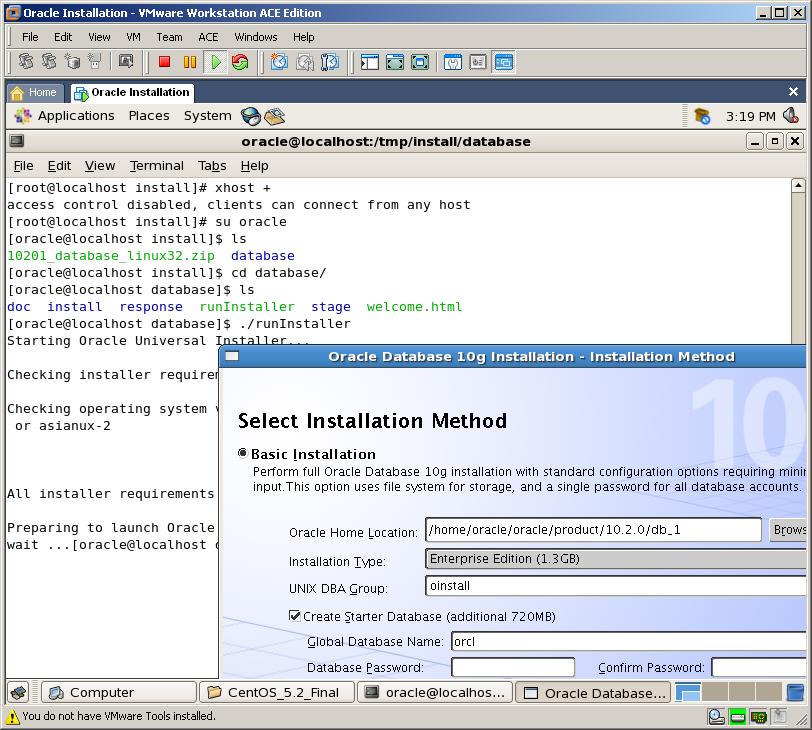
Oracle Database 10g Installation
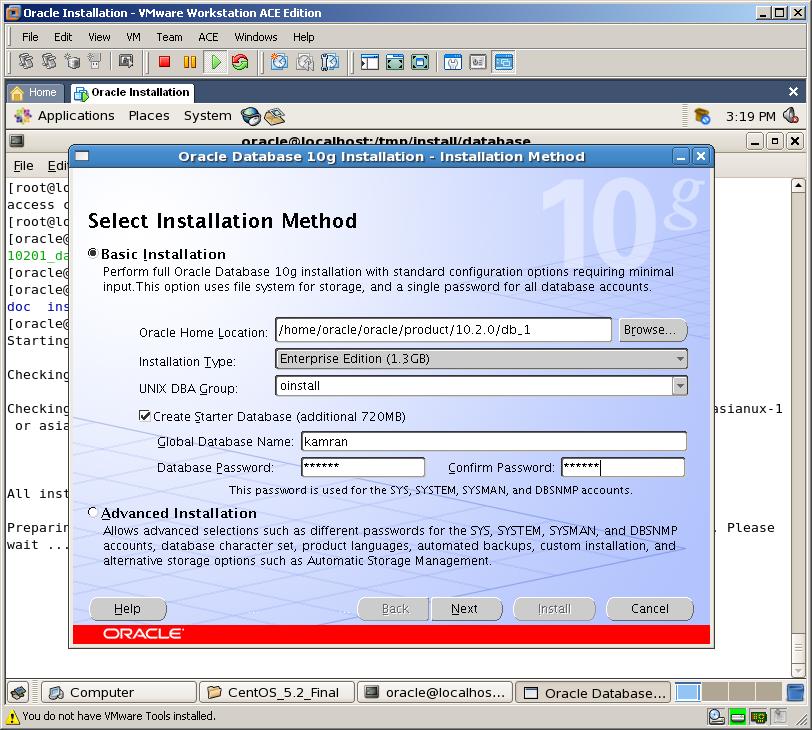
If you want to create new database after software installation, check “Create Starter Database” checkbox and enter database name and password, then click Next
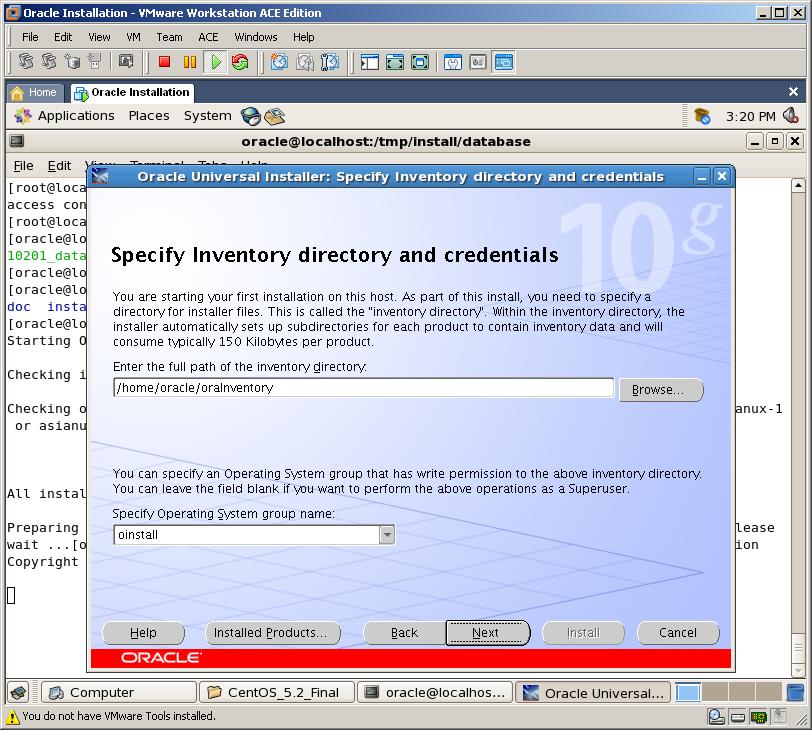
Specify Inventory directory (keep it as default) and click Next
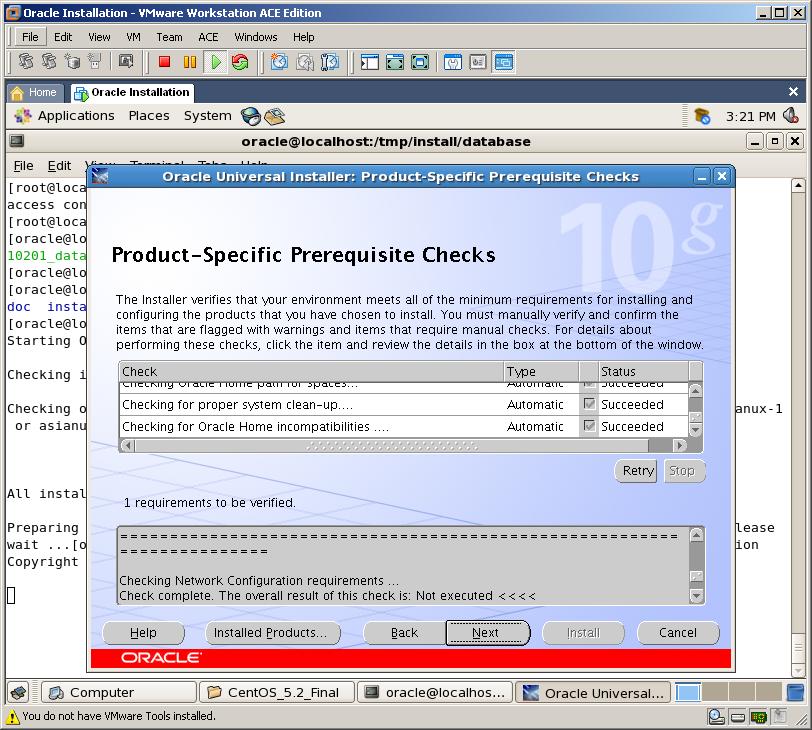
Here we see that all Prerequisite Checks succeeded.
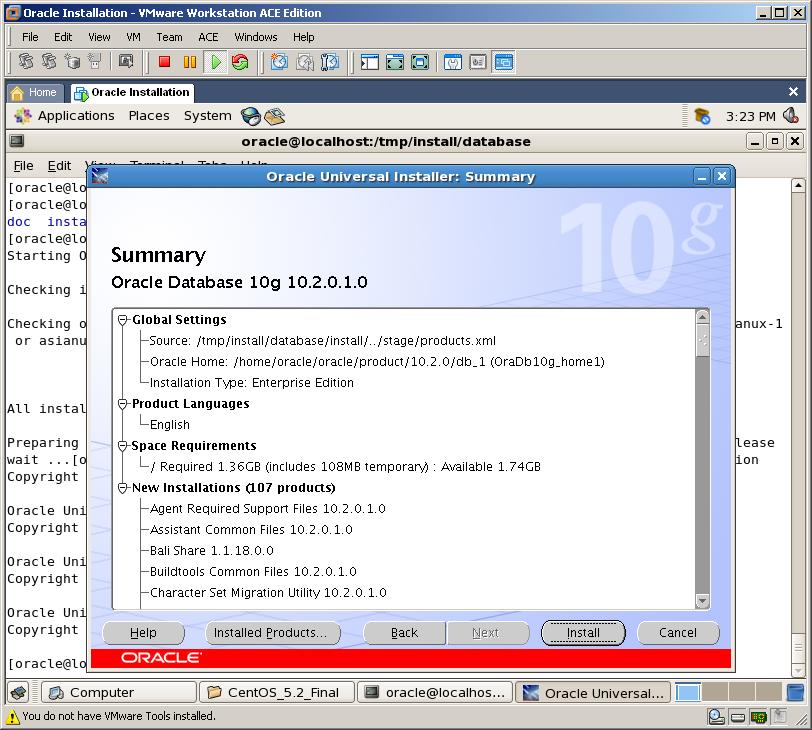
Click Install to begin installation
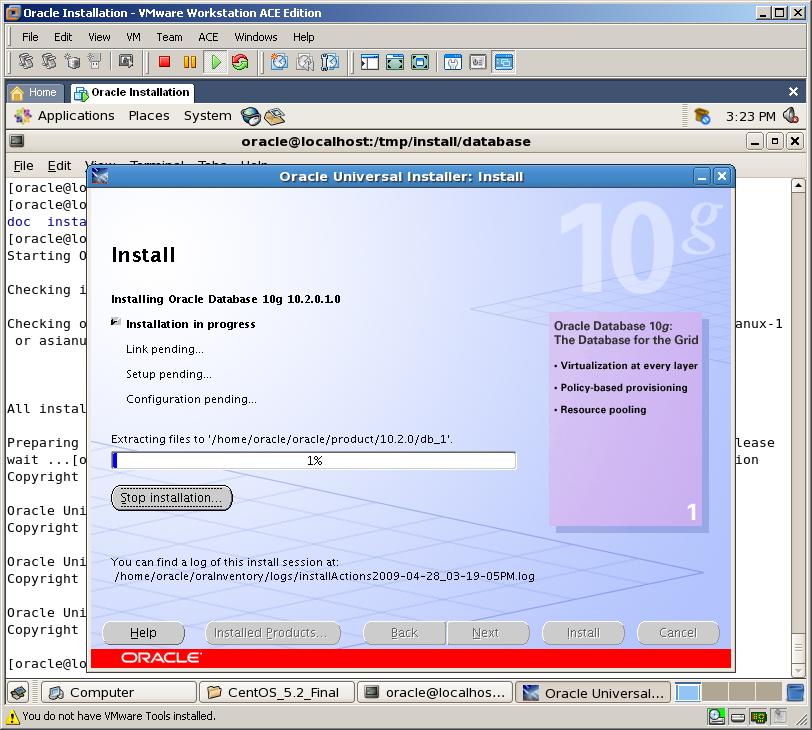
Now, we’re installing Oracle 10g Software.
6. Creating an Oracle Database
As we’ve checked “Create Starter Database” at the first page of the installation, new database will be created automatically after software installation
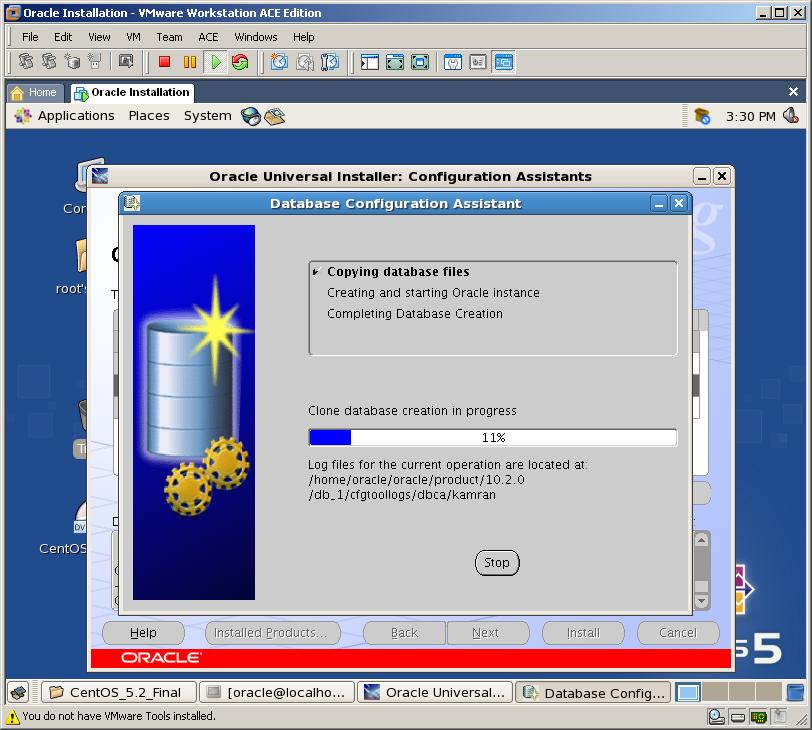
After database created, you’ll get information about your database, Enterprise Manager and Spfile
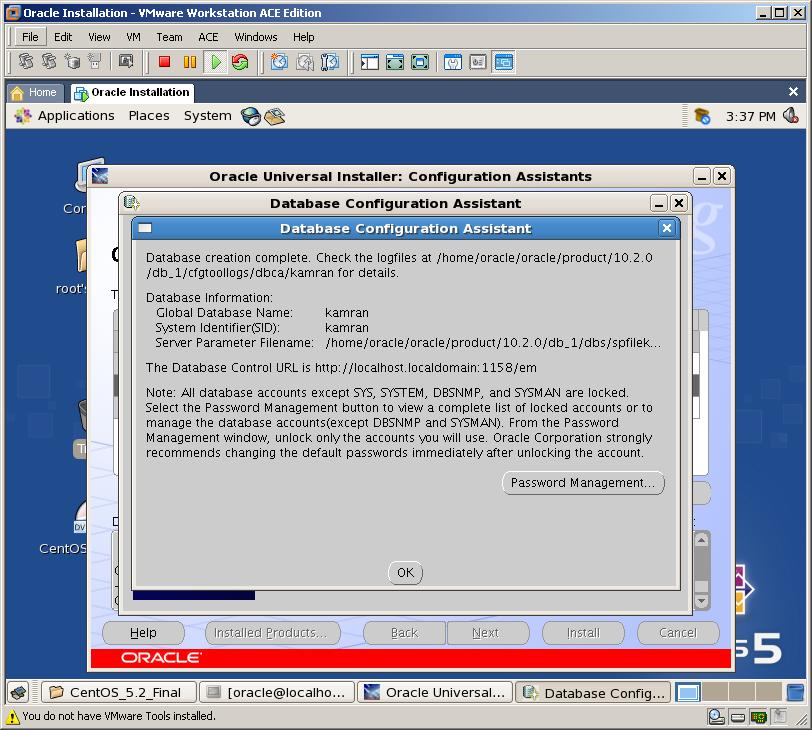
Click Ok. In the below window, you’ll get location for two scripts which you should run as a root user to complete last configurations. Open new Terminal window and run those two scripts:
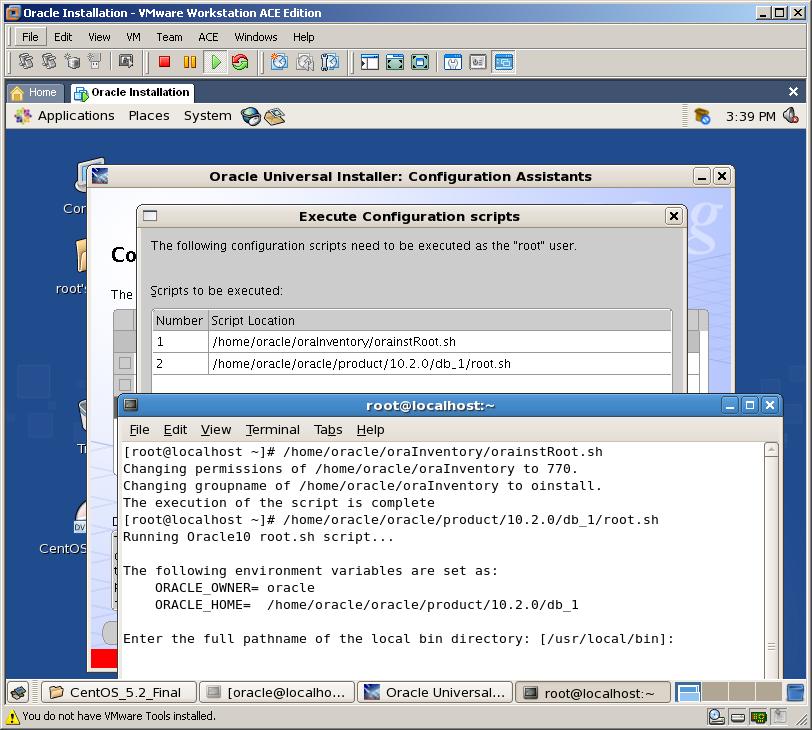
Installation of Oracle Database 10g completed successfully! Congratulations!
Now reboot your server and login as oracle user and start newly created database.
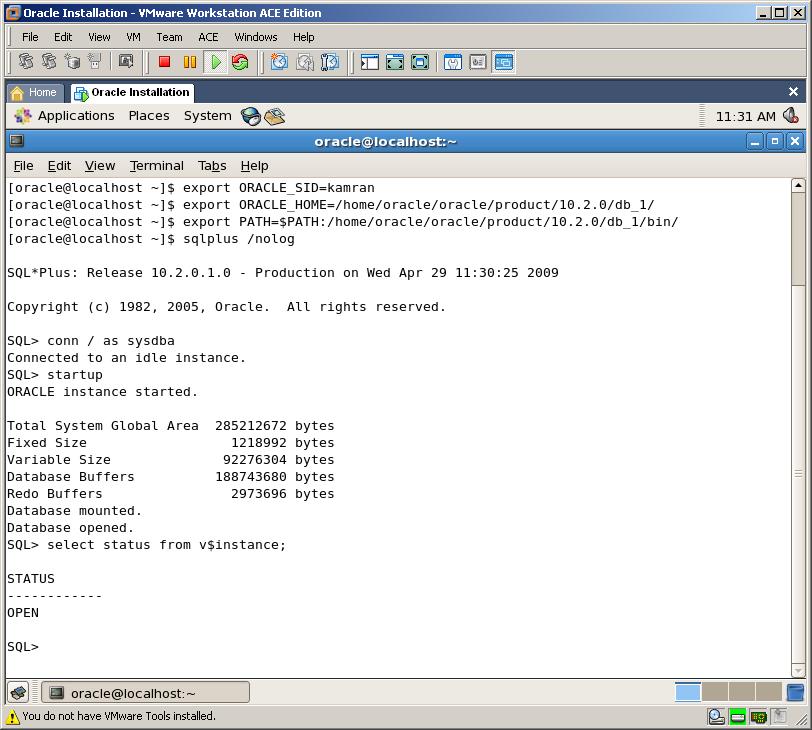
If we want to login to our database, we run sqlplus. But before it, we need to set Environment Variables. We can do it automatically by adding them to .bashrc file in the/home/oracle directory as below:
export ORACLE_HOME=/home/oracle/oracle/product/10.2.0/db_1
export LD_LIBRARY_PATH=$LD_LIBRARY_PATH:$ORACLE_HOME/lib
export PATH=$ORACLE_HOME/bin:$PATH
alias database =’export ORACLE_SID=kamran;sqlplus “/ as sysdba”‘
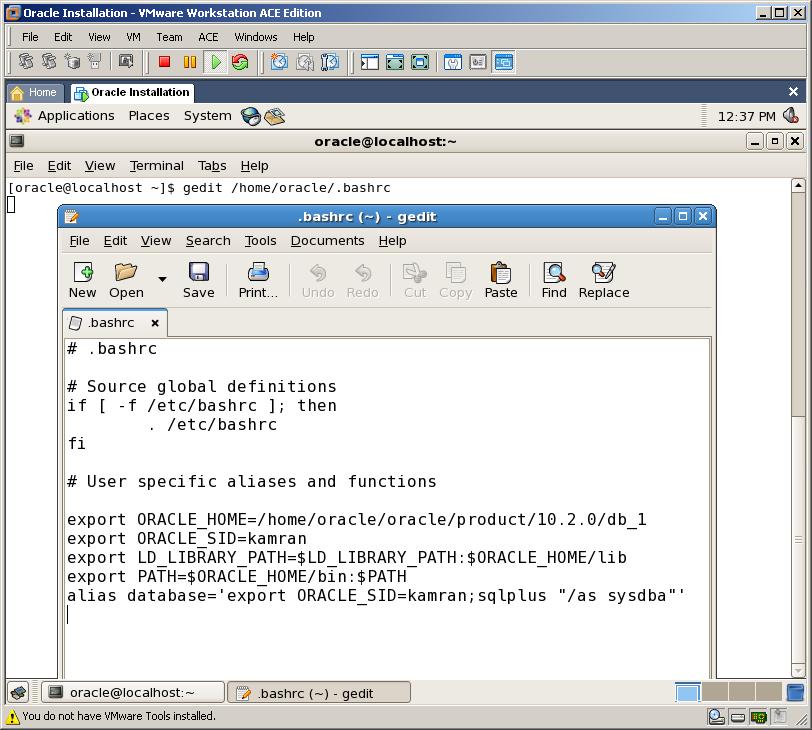
Now, let’s open new terminal and try again
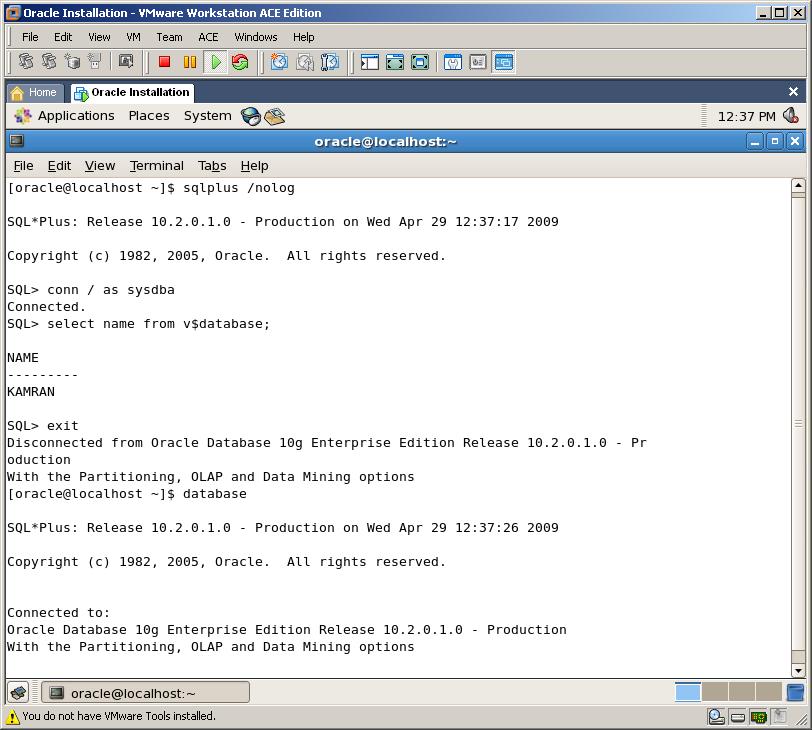
As you see, after setting Environment Variables to their correct values, I was able to login to SQL*Plus using two ways.
7. Connecting to Database with Enterprise Manager
Now, let’s start Oracle Enterprise Manager. In order to use EM, we should firstly start listener. In production environment, you need automate database, listener and EM startup. To automate them, please refer to one of my previous blogs – “Automatically StartUp and Shutdown an Oracle Database in Linux OS”
Start the listener
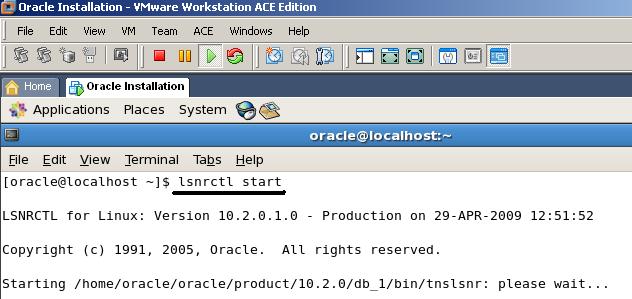
Then, start Enterprise Manager
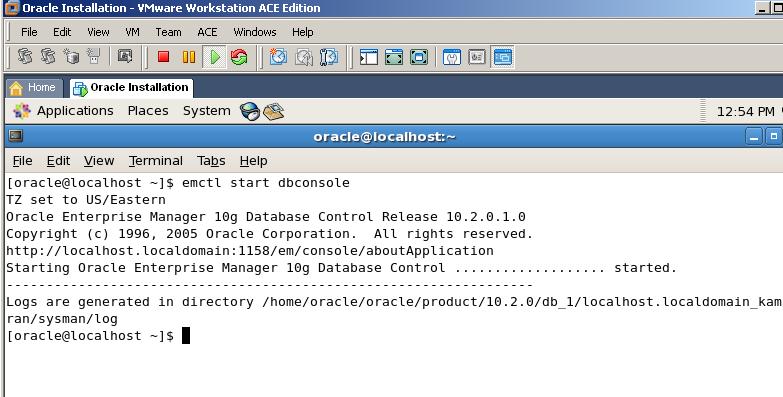
Now, we can login to EM page to administer our database using above given address:
http://localhost.localdomain:1158/em/
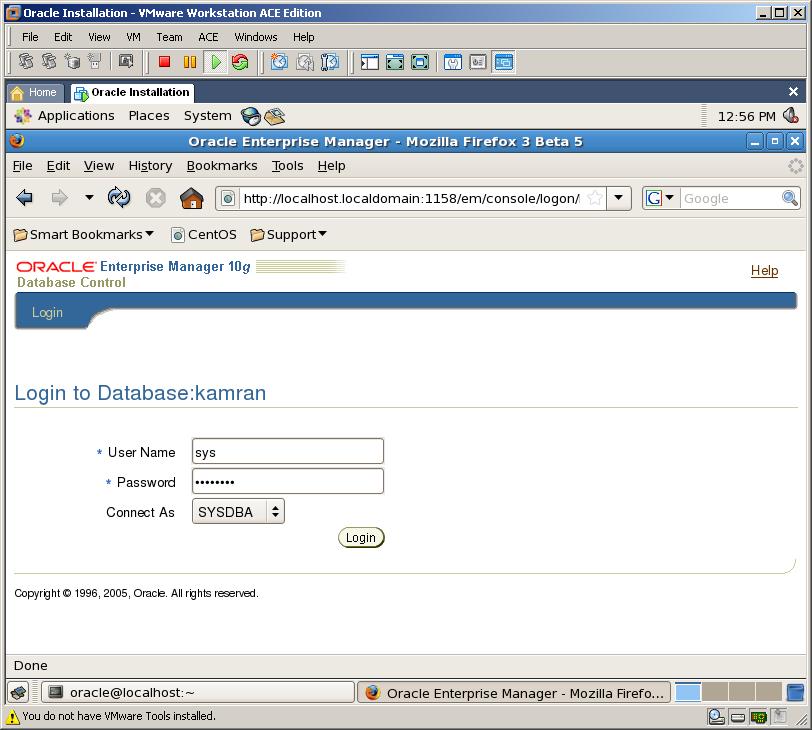
Enter user sys and its password, then select “SYSDBA” as a role and click Login
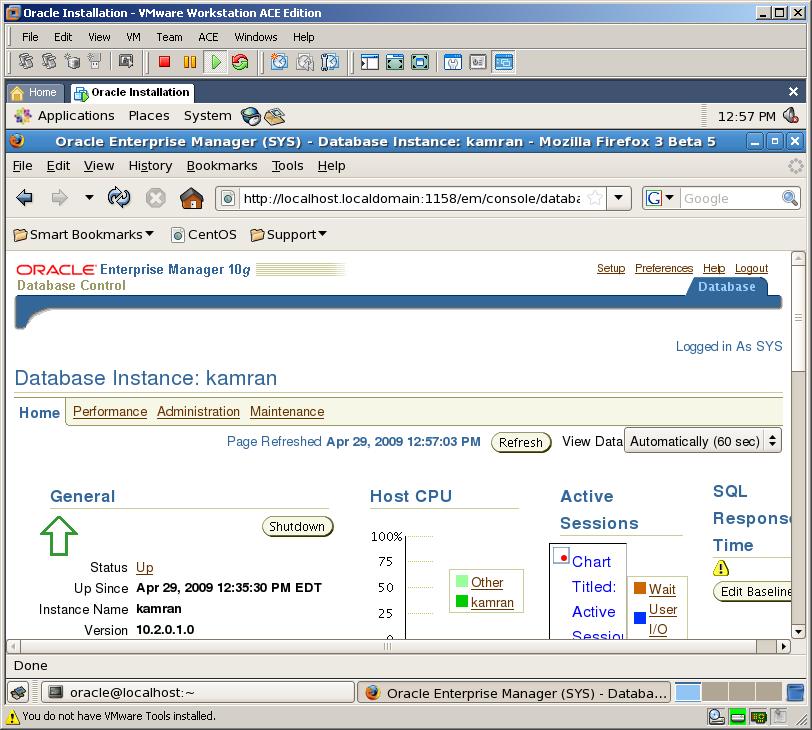
Using Enterprise Manager, you can administer your database in very easy steps
That’s all!! Our Database and EM is ready for use! Congratulations!!!
By following above mentioned steps we were able to install Oracle 10g R2 on CentOS 5. But if we carry out frequent tests and as a result of these tests each time we are to install Oracle Database, then we need to automate installation of Oracle Database. I would suggest two options to overcome this problem:
1. To install CentOS+Oracle on VMware and copy image of VMware to elsewhere, then each time use this image to get fresh copy of Oracle Database
2. To automate installation of Oracle Database by using Shell Script
Let’s explain each option in details:
1. Firstly, I usually create new Virtual Machine with 10GB size. Then, I install CentOS on it and create an Oracle Database with all its configurations. Then I shut down Virtual Machine and copy all the folders to another directory. Usually, I create two copies of the Virtual Machine. Then I do all my tests on the first Virtual Machine. When it becomes useless, I shut down and delete it as a whole folder, open second Virtual Machine which I’ve copied and continue my tests.
2. Second way is the best method of approach to the problem. For this, I create a shell script and write all steps and do all configuration changes from this script. By running this script once, all configurations needed for Oracle Installation will be changed automatically and we will only be asked for new oracle user’s password and next we’ll see installation page open.
Automating installation of Oracle Database 10g Release 2 on Centos 5 using Shell Script
To automate this job, we wrote a Shell Script. Before running this script, we should follow some steps as shown below:
1. Firstly you should know that before running this script we should create install directory in /tmp directory and copy zipped installation file of Oracle to this directory with this installation script
2. Before running this script we must be sure that installation DVD of CentOS has been inserted or installation DVD image of CentOS mounted to the system. You can check it by running this code:

3. After installation completes, change the following Environment Variables and alias name into proper names which you’ve used during installation in the .bashrc file
1. ORACLE_HOME – If it is different folder, change it to correct value
2. ORACLE_SID – If it is different SID, change it to correct SID
3. As an alias, you can assign whatever you want
If everything is OK as mentioned above, we change directory to /tmp/install folder and runinstall.sh file. By running this shell script, all configurations needed for installation will be automatically changed and only thing asked will be oracle user’s password. After that we’ll see Oracle Database installation page. By clicking Next buttons we’ll be able to install Oracle Software and Database very easily
Now, let’s install Oracle Database 10g using this Shell Script
First of all, we need to create install folder in the /tmp directory and copy zipped installation file of Oracle Database 10g to /tmp/install directory with install.sh script and check their existence. After that we need to mount Centos DVD once more, because we’re going to install some packages that were not installed with CentOS. After getting below screen, you can start installation
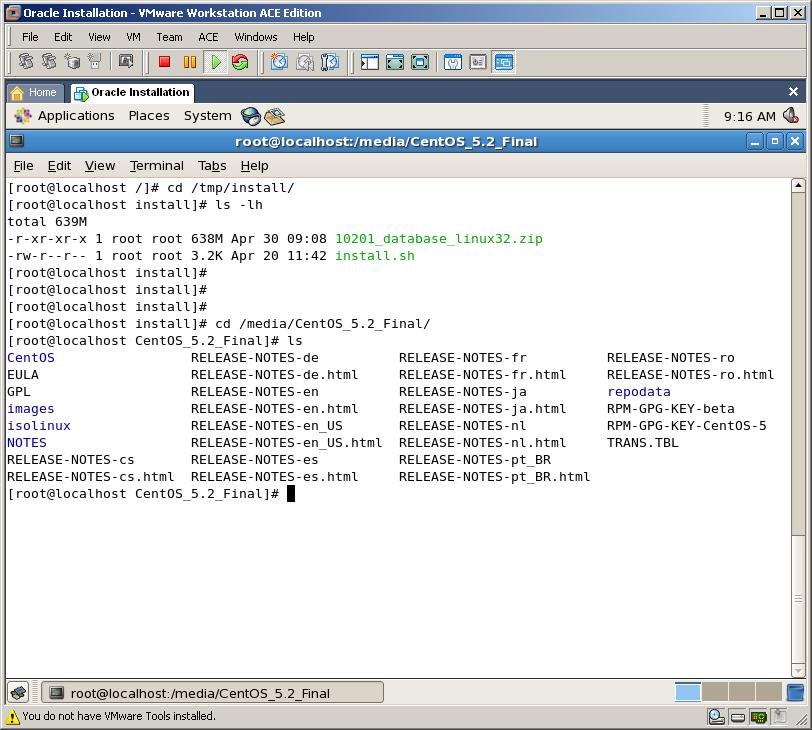
Here we see that
- We have zipped installation file of Oracle Database 10g in the /tmp/install directory
- We mounted CentOS DVD
Now, switch to /tmp/install folder and run install.sh script
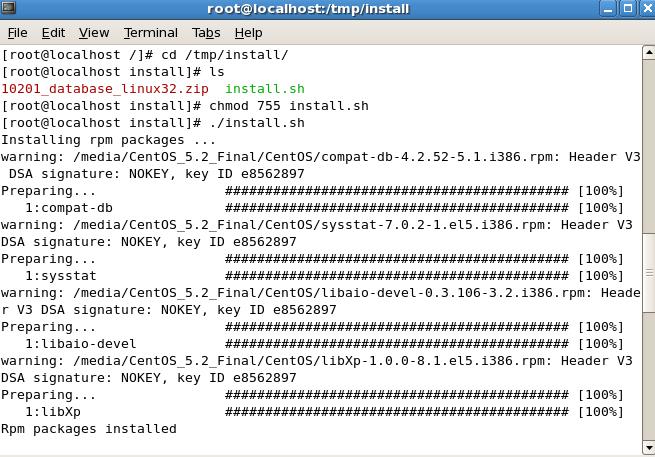
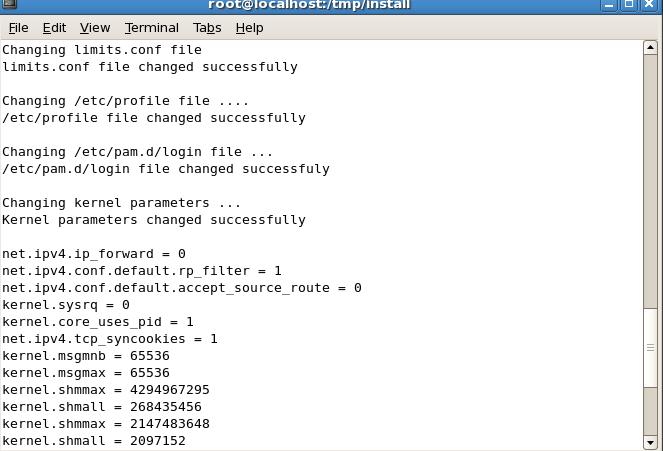
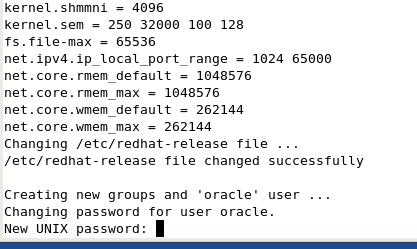
Here, enter oracle user’s password. Then click ok. After this step, zipped file will be unzipped
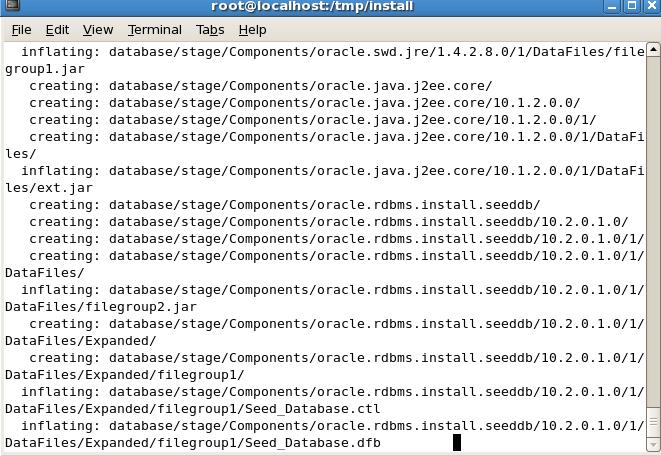
After it finishes unzipping, we’ll get Installation Window
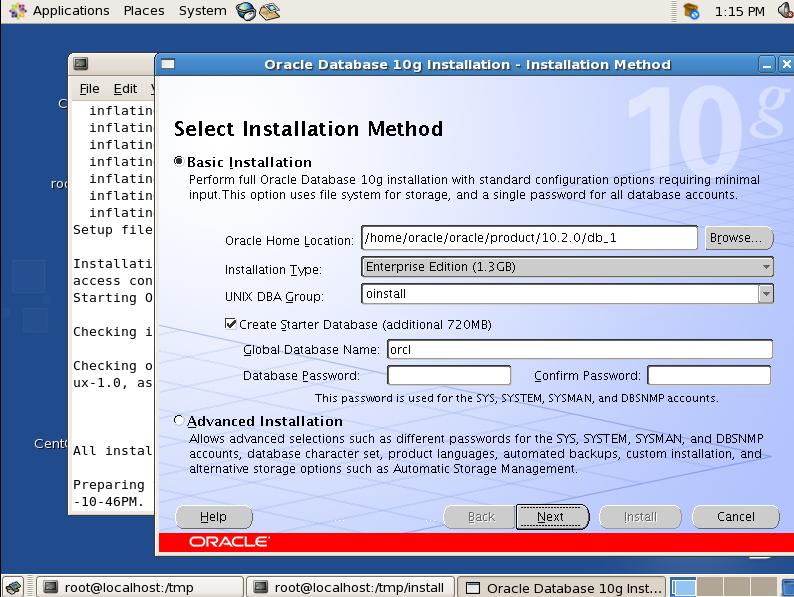
That’s all! After getting this page, you should follow above mentioned installation steps in which we installed Oracle Database manually.
Using automatic install script we’ve avoided of all configuration settings and got Oracle 10gR2 installer page opened successfully
The automatic installation script for Oracle Database on Linux is as follows:
#########———— Installing Rpm files —–########
#Change directory to /tmp/install
cd /tmp/install
#Install all packages that are not installed during OS installation and that are required packages for Oracle Database 10gR2
echo “Installing rpm packages …”
rpm -Uvh “$(find /media/ -name compat-db*)”
rpm -Uvh “$(find /media/ -name sysstat*)”
rpm -Uvh “$(find /media/ -name libaio-devel*)”
rpm -Uvh “$(find /media/ -name libXp-1*)”
echo “Rpm packages installed
“
#Add lines to limits.conf file
echo “Changing limits.conf file”
cat >> /etc/security/limits.conf <
oracle soft nproc 2047
oracle hard nproc 16384
oracle soft nofile 1024
oracle hard nofile 65536
EOF
echo “limits.conf file changed successfully
“
#Add lines to profile to give maximum limit for Oracle user
echo “Changing /etc/profile file ….”
cat >> /etc/profile <
if [ \$USER = "oracle" ]; then
if [ \$SHELL = "bin/ksh" ]; then
ulimit -p 16384
ulimit -n 65536
else
ulimit -u 16384 -n 65536
fi
umask 022
fi
EOF
echo “/etc/profile file changed successfully
“
#Add line to /etc/pam.d/login file
echo “Changing /etc/pam.d/login file …”
cat >> /etc/pam.d/login <
session required /lib/security/pam_limits.so
EOF
echo “/etc/pam.d/login file changed successfuly
“
#Add some kernel parameters to /etc/sysctl.conf file
echo “Changing kernel parameters … “
cat >> /etc/sysctl.conf <
kernel.shmmax = 2147483648
kernel.shmall = 2097152
kernel.shmmni=4096
kernel.sem=250 32000 100 128
fs.file-max=65536
net.ipv4.ip_local_port_range=1024 65000
net.core.rmem_default=1048576
net.core.rmem_max=1048576
net.core.wmem_default=262144
net.core.wmem_max=262144
EOF
echo “Kernel parameters changed successfully
“
#Save all new kernel parameters
/sbin/sysctl -p
#Add “redhat-4″ line to /etc/redhat-release file
echo “Changing /etc/redhat-release file …”
cp /etc/redhat-release /etc/redhat-release.original
echo “redhat-4″ > /etc/redhat-release
echo “/etc/redhat-release file changed successfully
“
#Create new groups and “oracle” user and add this user to group
echo “Creating new groups and ‘oracle’ user …”
groupadd oinstall
groupadd dba
useradd -m -g oinstall -G dba -d /home/oracle -s /bin/bash -c “Oracle Software Owner” oracle
passwd oracle
echo “Groups and user created successfully
”
#Adding Environment Variables
#Adding Environment Variables
cat >> /home/oracle/.bashrc <
export ORACLE_HOME=/home/oracle/oracle/product/10.2.0/db_1
export LD_LIBRARY_PATH=$LD_LIBRARY_PATH:$ORACLE_HOME/lib
export PATH=$ORACLE_HOME/bin:$PATH
alias mydb=’export ORACLE_SID=mydb;sqlplus “/ as sysdba”‘
export ORACLE_SID=mydb
EOF
EOF
#Unzip setup of Oracle
echo “Unzipping setup of Oracle 10g Release 2…. “
unzip 10201_database_linux32.zip
echo “Setup file successfully unzipped
“
#Enter to installation directory and run the installation …
echo “Installation begins …”
cd /tmp/install/database
chmod 755 runInstaller
chmod 755 install/.oui
chmod 755 install/unzip
xhost +
sudo -u oracle /tmp/install/database/runInstaller
Subscribe to:
Posts (Atom)